Facebook
 Google
 GitHub
 Linkedin
Sense HAT: The Coolest HAT for the Raspberry Pi
This top-mount accessory for the Raspberry Pi offers various capabilities at a low cost, perfect for analyzing and solving problems related to vibration, temperature, humidity, and others.
Perhaps there is some argument that this is, indeed, the most amazing accessory for the Rasberry Pi, but there is no doubt that sensing is important in the world of control engineering.
Why Does Your Computer Need a HAT?
Generally, a Hardware Attached on Top (HAT) accessory in the Raspberry Pi ecosystem refers to an add-on board that interfaces with the Pi's general purpose input/output (GPIO) pins. These HATs enable or augment the capabilities of the Pi while eliminating the need for complicated wiring, breadboards, resistors, and other electrical components. For enthusiasts of other hardware platforms, this is the same concept as a shield marketed for the popular Arduino boards. HATs can be thought of as hardware-as-a-service for the Raspberry Pi. You are paying for something that works out of the box. And boy, does this Sense HAT deliver!
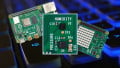
It is a simple Internet of Things starter for the Raspberry Pi offered for a low cost of around 30 USD at the time of this writing. The most notable visual feature at first glance is the 8x8 RGB matrix.

Figure 1. The 8x8 RGB matrix of the Sense HAT. The HAT is stacked on a Raspberry Pi using the GPIO header. Image used courtesy of Raspberry Pi
Other specifications include a 5-way joystick and a decent offering of sensors for a variety of applications. These sensors include a gyroscope, accelerometer, magnetometer, temperature, barometric pressure, and humidity sensors.
How Is the Sense HAT Used?
A dedicated Python library called sense_hat is used to unlock the capabilities of the Sense HAT’s sensors and features. The sensors serve to connect the Pi to the environment surrounding it. Unfortunately, connecting industrial-level external analog or digital signals to the Sense HAT is outside of the target use cases for the device. However, if monitoring ambient environment conditions that are critical for production is important, the Sense HAT offers a quick low-cost solution.
A couple of example use cases might include monitoring the humidity of an injection molding floor when working with moisture-absorbing polymers such as Nylon or TPU. Vibration sensing for any kind of industrial machine can help to predict failures and prevent costly breakdowns.
A more general IoT use case that has been demonstrated by many users is the use of the Sense HAT as a weather station. Some of the more eccentric use cases include handheld games programmed onto the Pi utilizing the gyroscope and RGB board of the Sense HAT.
Hardware Setup
This part is relatively simple. If you have not set up a Raspberry Pi in the past, best refer to the previous article which defines the basics of the platform and the development environment.
After covering that basic setup, install the 4 provided posts to the Raspberry Pi indicated by the red boxes below:

Figure 2. The four posts have been added to the Pi. Image provided by the author
The Sense HAT should then be connected firmly (but squarely) straight down onto the GPIO pins and screwed lightly in place to the added posts with provided screws. The completed unit should appear as below:

Figure 3. The HAT is attached to the Pi and secured by the Phillips-head screws included. Image provided by the author
Software Setup
The Raspberry Pi OS should include the sense_hat module pre-installed with the operating system distribution. However, if there are any issues with the dependency the following commands can be run. Ensure the APT package list is current:
sudo apt update
Install the sense_hat module:
sudo apt install sense-hat
Restart the Pi for changes to take effect:
sudo reboot
Showing a Message
This is a starting example from the Raspberry Pi tutorial on the Sense HAT which can be found here: Official Tutorial. I’ll be showcasing how to complete the tutorial headless, or through a terminal window utilizing an SSH connection.
Access terminal or powershell on your local PC and connect to the Sense HAT. This process also is covered in the previous Raspberry Pi Setup article. Once connected to the Pi, follow the series of commands below. Please do not worry if the Linux commands are foreign. We are creating a new directory (mkdir) and adding an empty python file (touch) to house the example code as shown below.

The last command line prompt will open a text editor called Nano upon being executed. The editor environment will be initialized below:

Now we will copy and paste the boilerplate hello world code in the nano editor window, which will cause scrolling text to appear on the RGB LED matrix on the top of the HAT:

Saving the file is a 3-step process:
- Ctrl + x to exit
- Enter “y” to save changes
- Hit the enter/return key
You should now be redirected to the terminal window, where running the following command will execute the Python script:

The words “Hello World!” should flash across the matrix board upon execution.
Message Parameters
The show_message() method offers several parameters that allow the user to customize the appearance of the message on the Sense HAT. For example, let’s add some requirements to the prior example. This new iteration will display “Control.com!” and will have the letters scroll twice as slowly across the RGB matrix. Furthermore, the text color will be changed to red and a yellow background will be applied. At the end of the message, the yellow background should be disabled. Editing the file with the nano editor yields the following script:
from sense_hat import SenseHat
sense = SenseHat()
red = (255,0,0)
yellow = (255,255,0)
sense.show_message("Control.com!",text_colour=red,back_colour=yellow,scroll_speed=0.2)
sense.clear()
The Sense HAT should show our updated requirements upon execution using the same command:
python3 helloworld.py
Conclusion
In this article, we scratched the surface of the capability of the Sense HAT and built an initial development environment. There are many potential use cases for this add-on device, and many users have projects showcased online. Further articles will explore other sensors of the Sense HAT.