 Facebook
 Google
 GitHub
 Linkedin
Small-Scale Automation Projects: Setting the Table for Raspberry Pi
Automation can be inexpensive for small projects by using development boards. This article presents a walkthrough of the setup and installation steps for the popular Raspberry Pi.
The popular Raspberry Pi platform has provided electronic and automation enthusiasts with an environment for designing projects that act as small industrial PCs, able to interact with various peripherals, including sensors, HMIs, motors, and internet-based services. In almost every way, this is a perfect test bed for IIoT projects.
Some projects in this environment are used only for learning and for proof-of-concept development. However, many Raspberry Pi projects find their way into real-world industrial settings. Getting started with the operating system is a perfect first step to establishing more robust skills to test the limits of IoT functionality.
Bill of Materials for Pi Setup
In order to get set up with the Raspberry Pi 4, there are a few materials required. If possible, purchasing the unit in a starter package bundle will make setup much easier. There are numerous sellers on Amazon offering packages. However, purchasing the required materials separately is acceptable as well. Required materials include:
- Raspberry Pi 4 unit (any previous Raspberry Pi model will follow similar steps, but some hardware and performance specs may differ)
- MicroSD storage device
- A local computer
- microSD adapter (if your local computer does not have a microSD port)
- A power supply compatible with Raspberry Pi 4 (USB-C supply rated for 2.5 amps or more)
With the required materials in hand, let's get started!
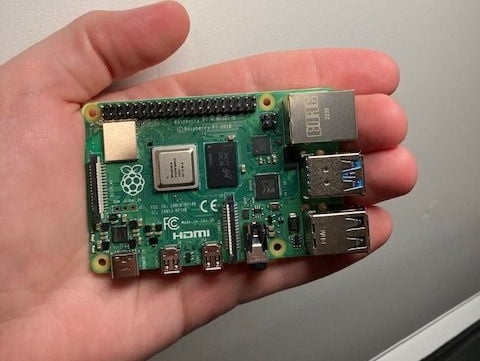
Figure 1. The palm-sized Raspberry Pi 4. Image provided by the author
Raspbian Operating System (OS)
The first step is to install the native Raspberry Pi operating system onto the SD card. Raspberry Pi OS, the latest version of the system, was initially called Raspbian. The Unix-style OS is based on the Debian Linux distribution. If you are a Mac user, this OS will feel very familiar, especially in the terminal environment. The OS can be found here: Raspberry Pi OS. Once redirected to the official Raspberry Pi page, there is an option to download the imager. This OS software loads the operating system properly onto the SD card; simply copying files will not work.
Select the appropriate option for your respective local machine.

Figure 2. Raspberry Pi Imager download. Image used courtesy of Raspberry Pi
Once the Raspberry Pi Imager is installed, execute the program. In a nutshell, this program facilitates the transfer of the Raspberry Pi OS to the microSD card. First, select the recommended Raspberry Pi OS (32-bit) from the “Operating System” section.

Figure 3. Raspberry Pi Imager menu. Image used courtesy of Raspberry Pi
Next, plug the microSD card into your computer using either the native port or an adapter. Once inserted, select the “SD Card Reader…” button and select the drive location on your local PC:

Figure 4. Raspberry Pi Imager Storage menu. Image used courtesy of Raspberry Pi
Before we write the image, or operating system (OS), to the microSD card, select the lower right gear icon for advanced settings. Within the advanced settings, we’ll enable a network protocol called SSH or secure shell. This will allow us to remotely access the Raspberry Pi from our local PC without needing a monitor or HDMI cable.
Within this settings page, it will also be a good idea to provide your router information. This will allow the Raspberry Pi to connect to your local home network upon startup, and thus allow your PC to access via SSH.

Figure 5. Raspberry Pi Imager advanced options. Image provided by the author
Accessing Raspberry Pi Remotely
To remotely access the Pi, open up a terminal. In PowerShell on a Windows system or a terminal on a Mac, the command is the same:
ssh [email protected]
You may get a warning that the host cannot be authenticated. Enter yes + enter to proceed with connecting to the Pi. Next, the terminal will prompt for the SSH password set in the advanced options (Figure 5). Enter that password into the terminal. Please do not be alarmed if no keys or visible feedback is being displayed as you are typing in the password. No visual cues are normal. Once you have entered the respective password, select enter. You should now have access to a remote terminal within the Pi from your local PC. You’ll notice the username@hostname preceding each command now.
If you are a Windows user, you’ll also notice that even though you are running Powershell on your Windows box, the command line is now Linux-based, given by the ~$:

Figure 6. Successful SSH login. Image provided by the author
If you wish to close the SSH session, typing “exit” and hitting enter will close the connection:

Figure 7. Exiting an SSH session. Image provided by the author
Accessing Raspberry Pi with Physical Hardware
Having a visual display is much easier to navigate than the terminal, but you will need a keyboard, mouse, HDMI cable, and monitor to make this approach successful. With all ports plugged in, the setup should appear similar to below.

Figure 8. Raspberry Pi with local hardware for accessing the operating system. Image provided by the author
Once booted up, the Raspberry Pi homepage on the monitor should resemble below, although perhaps the command prompt window will not always be active.

Figure 9. Successful boot onto the operating system desktop display. Image provided by the author
Tasty Stuff: Get Started with the Raspberry Pi Today
Getting started is relatively painless with the Raspberry Pi. For those hungry for more on Raspberry Pi, this article is the prequel to future Raspberry Pi-related content. It's tasty stuff: The possibilities of projects and ideas are endless with this low-cost versatile system.
Related Content


I’ve been using Raspberry Pis for all sorts of projects with 100% success, some of which have been operating for 3-4 years without my needing to touch them. At work we have used a couple of Raspberries to solve problems that otherwise would have required a Windows PC. In a manufacturing process, the last thing you want is a centrally-administered Windows PC which can be rendered useless in the middle of a shift because the Ivory Tower pushes an update (that often breaks something). Since there is now a dotNet clone for Linux, we don’t need a Windows PC for EVERYTHING anymore.