Facebook
 Google
 GitHub
 Linkedin
Electronics is the world of manual and automatic sensors that are controlled using electronic components and embedded electronic modules. circuits build, control, and monitor automation of electronic machine control that is connected both remotely and nearby using the Arduino and Blynk console programming languages and embedded micro controller hardware that is connected to a stable internet network. Visualize and control your sensor data from anywhere. the installation technique is with the following steps:
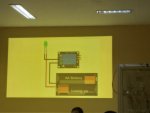
1. Create analog and digital circuits on drawing tools or proteus.
2. Create a hardware circuit to the Arduino
3. Create a flowchart
4. Then create it to the Blynk console
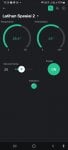
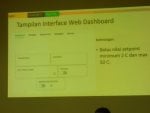
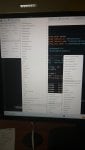
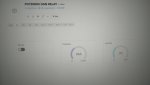
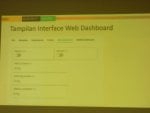
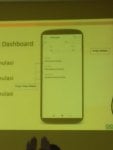
5. Then follow the steps above from the Blynk console to the web dashboard. remote control can use a laptop or cellphone connected to the internet can be wifi or hot spot, previously download the Blynk console application on a laptop or cellphone as a hardware control and monitoring. The display on the laptop uses the Blynk console application; while on the cellphone also uses the Blynk application; our task is to draw the circuit then make it into the hardware module and also make the program language then upload it, if successful open the blynk laptop console for demo also from the cellphone for demo, internet connection. IoT works by translating the programming language that we have entered or uploaded into the IoT device. The device is also commonly known as a Microcontroller. There are many types of microcontrollers today. Such as Arduino Uno R3, Raspberry Pi, Intel Galileo, and so on. Each microcontroller must have a level of ability to process the IoT system based on its intelligence. IoT or Internet of Things is a concept to expand the benefits of internet connectivity that is always connected. Among them are the ability to share data, remote control and also read sensors connected to hardware such as Arduino. Example language program ;
#define BLYNK_PRINT Serial
#define BLYNK_TEMPLATE_ID "TMPL6rpY4cZPL"
#define BLYNK_TEMPLATE_NAME "Latihan spesial 2"
#define BLYNK_AUTH_TOKEN "NcZqV3AM-4CsU5FJG_wp5l9LU847TRR1"
#include <ESP8266WiFi.h>
#include <BlynkSimpleEsp8266.h>
char ssid[] = "Galaxy A02";
char pass[] = "agustinus1234";
#include "DHT.h"
#define DHTPIN D5
#define DHTTYPE DHT11
DHT dht(DHTPIN, DHTTYPE);
#include <LCD_I2C.h>
LCD_I2C lcd(0x27, 16, 2);
BlynkTimer timer;
float h, t;
const int buzzer = D0;
int setpoin, enable;
void setup()
{
Serial.begin(9600);
Blynk.begin(BLYNK_AUTH_TOKEN, ssid, pass);
dht.begin();
lcd.begin();
lcd.backlight();
lcd.setCursor (0,0);
lcd.print ("AGUSTINUS");
lcd.setCursor (0,1);
lcd.print ("BBPVP BEKASI");
delay(5000);
lcd.clear();
pinMode (buzzer, OUTPUT);
timer.setInterval(100L,sensorku);
}
BLYNK_WRITE(V2){
setpoin = param.asInt();
}
BLYNK_WRITE(V3){
enable = param.asInt();
}
void sensorku (){
h = dht.readHumidity();
Blynk.virtualWrite (V1, h);
lcd.setCursor (9,0);
lcd.print ("h:");
lcd.print(h);
t = dht.readTemperature();
Blynk.virtualWrite (V0, t);
lcd.setCursor (0,0);
lcd.print ("t:");
lcd.print(t);
lcd.setCursor(0,1);
lcd.print("s:");
lcd.print(setpoin);
if (t >= setpoin && enable == 1){
digitalWrite (buzzer,1);
Blynk.virtualWrite (V4,1);
lcd.setCursor (11,1);
lcd.print ("b:ON ");
}else{
digitalWrite (buzzer,0);
Blynk.virtualWrite (V4,0);
lcd.setCursor (11,1);
lcd.print ("b:OFF");
}
if (enable==1){
lcd.setCursor (5,1);
lcd.print ("e:ON ");
}else{
lcd.setCursor (5,1);
lcd.print ("e:OFF");
}
}
void loop()
{
Blynk.run();
timer.run();
}
1. Create analog and digital circuits on drawing tools or proteus.
2. Create a hardware circuit to the Arduino
3. Create a flowchart
4. Then create it to the Blynk console
5. Then follow the steps above from the Blynk console to the web dashboard. remote control can use a laptop or cellphone connected to the internet can be wifi or hot spot, previously download the Blynk console application on a laptop or cellphone as a hardware control and monitoring. The display on the laptop uses the Blynk console application; while on the cellphone also uses the Blynk application; our task is to draw the circuit then make it into the hardware module and also make the program language then upload it, if successful open the blynk laptop console for demo also from the cellphone for demo, internet connection. IoT works by translating the programming language that we have entered or uploaded into the IoT device. The device is also commonly known as a Microcontroller. There are many types of microcontrollers today. Such as Arduino Uno R3, Raspberry Pi, Intel Galileo, and so on. Each microcontroller must have a level of ability to process the IoT system based on its intelligence. IoT or Internet of Things is a concept to expand the benefits of internet connectivity that is always connected. Among them are the ability to share data, remote control and also read sensors connected to hardware such as Arduino. Example language program ;
#define BLYNK_PRINT Serial
#define BLYNK_TEMPLATE_ID "TMPL6rpY4cZPL"
#define BLYNK_TEMPLATE_NAME "Latihan spesial 2"
#define BLYNK_AUTH_TOKEN "NcZqV3AM-4CsU5FJG_wp5l9LU847TRR1"
#include <ESP8266WiFi.h>
#include <BlynkSimpleEsp8266.h>
char ssid[] = "Galaxy A02";
char pass[] = "agustinus1234";
#include "DHT.h"
#define DHTPIN D5
#define DHTTYPE DHT11
DHT dht(DHTPIN, DHTTYPE);
#include <LCD_I2C.h>
LCD_I2C lcd(0x27, 16, 2);
BlynkTimer timer;
float h, t;
const int buzzer = D0;
int setpoin, enable;
void setup()
{
Serial.begin(9600);
Blynk.begin(BLYNK_AUTH_TOKEN, ssid, pass);
dht.begin();
lcd.begin();
lcd.backlight();
lcd.setCursor (0,0);
lcd.print ("AGUSTINUS");
lcd.setCursor (0,1);
lcd.print ("BBPVP BEKASI");
delay(5000);
lcd.clear();
pinMode (buzzer, OUTPUT);
timer.setInterval(100L,sensorku);
}
BLYNK_WRITE(V2){
setpoin = param.asInt();
}
BLYNK_WRITE(V3){
enable = param.asInt();
}
void sensorku (){
h = dht.readHumidity();
Blynk.virtualWrite (V1, h);
lcd.setCursor (9,0);
lcd.print ("h:");
lcd.print(h);
t = dht.readTemperature();
Blynk.virtualWrite (V0, t);
lcd.setCursor (0,0);
lcd.print ("t:");
lcd.print(t);
lcd.setCursor(0,1);
lcd.print("s:");
lcd.print(setpoin);
if (t >= setpoin && enable == 1){
digitalWrite (buzzer,1);
Blynk.virtualWrite (V4,1);
lcd.setCursor (11,1);
lcd.print ("b:ON ");
}else{
digitalWrite (buzzer,0);
Blynk.virtualWrite (V4,0);
lcd.setCursor (11,1);
lcd.print ("b:OFF");
}
if (enable==1){
lcd.setCursor (5,1);
lcd.print ("e:ON ");
}else{
lcd.setCursor (5,1);
lcd.print ("e:OFF");
}
}
void loop()
{
Blynk.run();
timer.run();
}
Attachments
-
 104.4 KB Views: 4
 -
 1.3 MB Views: 4
 -
 521 KB Views: 2
 -
 507 KB Views: 0
 -
 318 KB Views: 0
 -
 1.4 MB Views: 3
 -
 1.4 MB Views: 3
 -
 1.2 MB Views: 3
 -
 1.6 MB Views: 1
 -
 454.6 KB Views: 1