Facebook
 Google
 GitHub
 Linkedin
Set Up For Success | Scheduling Tasks in PLC Programs
When setting up a new program in a Rockwell PLC, task scheduling is an important and often overlooked issue where errors appear as inconsistencies, often incorrectly attributed to random faults.
When writing new programs in a classroom or lab setting, we often know the end goal and assume it stops there. In the real world, programming is often something that continues long after a machine is first installed. Machines are upgraded, improved upon, or rewritten completely to be incorporated into new systems. Because of this, it is important to try and set up your programs for the long haul.
Task Scheduling
First, let’s talk about priorities in a PLC. When logic is being executed, there are many different tasks being examined by a processor, but it can only handle one at a time. Some jobs require long slogs through complex logic, while others are very fast. Some are mission-critical, but others may be supportive tasks that are not time sensitive. If you have many tasks, it’s most likely a combination of 1 to 3 critical tasks and 1-3 supportive tasks, maybe more.
There are three different schedules you can pick from when creating tasks: Continuous, Periodic, and Event.
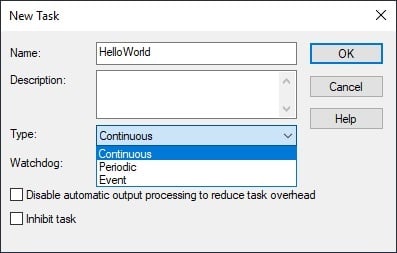
Figure 1. Setting the schedule type of a new task.
- Continuous tasks run all the time, unless the controller is stepping out to handle one of the other tasks. You can only have one Continuous task per controller.
- Periodic tasks run at a set schedule and are prioritized against each other.
- You must choose the period or interval between each occurrence of the task. The period is measured in milliseconds (ms).
- You also need to select the task’s priority. Priorities range from 1 to 15; the lower the number, the higher the priority. If you’re in the middle of a priority 10 and a priority 1 task occurs, the PLC will drop the 10, execute the 1, then pick up the 10 where it left off. If multiple tasks are running with the same priority, the PLC will do a 1 ms round-robin execution of the equivalent tasks.
- Event tasks are only executed when called for.
Continuous Tasks
When a machine requires careful timing, program schedules become important.
When you create your first task, you are required to select a schedule for that task to run. Did you know that the default schedule type is actually the worst one to contain a machine’s operational logic? I’m talking about the Continuous Task! The Continuous schedule executes at the lowest priority; it runs when there is nothing else to run.
If the entire program is running in a single continuous task, and there are no other tasks, you can simply time everything based on the run time of that one task. This time can be determined using a Get System Value (GSV) instruction that calls up the last scan time of the task. In the example below, the number 1971 equates to microseconds of run time, or 1.971 milliseconds.
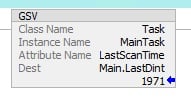
Figure 2. Measuring the scan time of a task.
Timing Problem With Continuous Tasks
The problem I ran into recently occurred when I needed to install a new task that operated at a very low priority.
This task was a fairly heavyweight alarm system containing over 1000 lines of internally scheduled logic. Because it was scheduled as a low priority, it can integrate alongside virtually any machine without creating issues. Only one thing could foil this plan, and this machine made it clear: the entire logic execution system was running as a continuous task.
Even with my logic running in a scheduled task at 250 ms intervals at the lowest priority, it would still interrupt the machine timing and create terrible problems, just because the continuous task is a lower priority than the lowest scheduled task. The timing system of the machine was effectively running as an afterthought in the PLC. Fortunately, there was no forethought, so the afterthought was all it needed. I knew I would have to change this continuous task into a scheduled task in order to proceed.
Solution: Converting Task Types
The Continuous task must be changed to a scheduled type, but now our timing is off because we can’t simply look at the last scan time of the task. I set the Scheduled task to 10 ms and placed it as the highest priority. Once this is done, we’d like to monitor the time passed for each scan cycle of the controller, giving us a way to measure any inconsistencies.
If you remember above, the time displayed in that GSV instruction is set to the last scan time of the task itself, not the total time passed in the controller. To remedy this, I need to add the task schedule time into the calculation. Now, knowing I set the timing to 10 ms, I could simply add 10000 microseconds to the last scan time, which would work, but it is just as shortsighted as the original use of the Continuous task. If the interval ever changed, this addition would need to be adjusted.
Instead, I can retrieve the actual schedule interval of the task. This process now uses two GSV instructions and some math. The first instruction, like before, measures the amount of time the task took to complete. The second instruction looks at the task information again, but this time it retrieves the Rate Interval, which is the actual scheduled time. Add these two values and the total time of the task+interval is calculated.
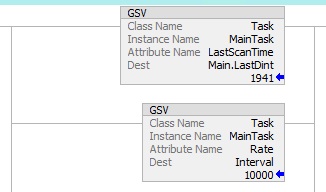
Figure 3. Retrieval of both the scan time and the interval of the MainTask.
Real-World Feedback
In the long run, when timing a machine, it is always best to use a physical encoder that allows events to be based on accurate, real-world feedback. Sometimes this is not reasonable, so we turn to a virtual timing system task, but we must have a way to correct for future changes.
By timing your machine with a higher priority, scheduled task, you create a consistent environment to run in. This consistent environment can now be measured with commands that give you the actual conditions of your program. In 10 years, when I’m gone from this place, anyone can get in and manipulate this task schedule and I know that the timing of the system will not be messed up because of it.
All images used courtesy of the author