Facebook
 Google
 GitHub
 Linkedin
Create Your Own IIoT Tech Stack Project | Part 4: Connecting MQTT Client to Broker
Continuing the real-world IIoT project, learn how to begin integrating the Raspberry Pi with the Mosquitto Broker and understand Docker networks and port binding.
In the previous article in this series (Part 3), we had built and verified a data packet using inputs from the Raspberry Pi Sense HAT, then we commissioned the Mosquitto MQTT broker. Now, it’s time to begin ‘connecting the dots’ to integrate the Pi with the broker.
Understanding Docker Networks
Before we integrate the Pi, let’s work on understanding what we just accomplished in part 3. The container is running and we created some ‘local_iot_network’ somewhere. What does all of this mean, and what’s happening inside our local machine?
Each container that we provision in this series will be attached to something called a private virtual network bridge. A virtual network bridge can have one or many containers attached to it, and multiple virtual network bridges can exist. Furthermore, a single container could also be attached to multiple networks–or even to none of them at all.
A best practice is to have only one virtual network bridge per application. So in our case, each of the containers in our IoT tech stack application will be connected to the local_iot_network we created in the Docker Compose file of part 3.

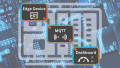
Figure 1. A visual representation of containers attached to the local_iot_network.
The virtual network bridge is attached to a NAT (network address translation) firewall on the host system IP. This allows us to link the container's private IP addresses to the host system’s IP address using the virtual network bridge.
An important concept here is that since each container will share the same host system IP address, the ports on which they are mapped need to be unique. The virtual network bridge running within docker on the laptop or local system does not share the same IP address as the local system. For example, on my system, the two networks are different and even have different notations (CIDR vs. traditional IP address):

Figure 2. IP addresses between the host machine and docker virtual network and containers are different.
Port Binding for Address Translation
So why is there a NAT firewall being used to link the private IP addresses of each of the containers to the local machine? This is where port binding comes into play.
At this point, we have only provisioned the Mosquitto broker with a private IP address of 172.21.0.2 as shown above in Figure 2. In the Docker Compose file, we created port binding in the ports element below:
ports:
- 1883:1883
- 8883:8883
This follows the same HOST:CONTAINER convention as volumes. Therefore, the NAT firewall and port binding allow us to map the Raspberry Pi traffic hitting the local machine, our laptop, to the Mosquitto broker within the virtual private network. An important concept here is that since each container will share the same host system IP address, the ports on which they are mapped need to be unique. For this reason, ports between the container and host machine do not need to have the same numeric value. An overview of the preliminary solution is below:

Figure 3. Port Binding and network packet flow from Raspberry Pi to Mosquitto broker.
Implementing the NeEtwork Data
Now that we have the general high-level concept of how the integration will occur, let’s implement! To start, we need to retrieve the IP address of our local machine. This can be accomplished with ifconfig en0 on a Mac or ipconfig on a Windows machine.

Figure 4. Using the ifconfig en0 command to obtain the IP address of the local machine (is ipconfig for a PC).
We will then use the SSH protocol to log in to the Raspberry Pi and update the config.json file with the IP address of our local machine. Remember, the port forwarding of the MQTT payload to port 1883 will bind to the Mosquitto broker container attached to the virtual network bridge. Navigate to the config.json file and utilize the nano editor to update the broker IP address.

Figure 5. Navigating to the json file in order to update the IP address of the local machine.
Within the nano editor enter the IP address of your local machine and save the changes:

Figure 6. Actually updating the IP address of the local machine on the Pi.
With the configuration changed to match our Mosquitto broker, running the Python publisher script should yield a connection.
mlevanduski@raspberrypi:~/Documents/mqttExample $ python3 edgePi.py
Configuration file read successfully
Connected with result code 0
You should also see the flashing green lights on the Sense HAT as a visual cue.
Subscribe to Verify
Similar to the step we used in part 2 of the series, it would be great to verify whether the payload is arriving at the broker end. Thus, we will recycle the subscriber script and subscribe to the local Mosquitto broker. Similar to the Pi, update the config.json file for the host system’s own IP address.

Figure 7. Updating the IP address of the local machine in the local system’s own json config file.
Once the IP address is changed, run the subscriber.py script developed earlier in part 2 of the series:
(venv) mlevanduski@Michaels-MBP mqtt % python3 subscriber.py
Configuration read successful
Connected with result code 0
Received message '{"hostname": "raspberrypi", "temperature": "31.517805099487305", "pressure": "922.594482421875", "humidity": "30.99437713623047"}' on topic 'building1/apt1/livingroom'
Our concept was successful! The Raspberry Pi is publishing Sense HAT sensor data (at least, sensor data for my setup in my own home) to the Mosquitto broker on the local machine.
Next Steps: Provisioning the Required Tool Sets
To complete the remaining steps of the project, we will need to provision the remaining tools in the tech stack, which will be explained in the next article, Part 5. Within each of these tools, we will need to supply configuration in order for the data to flow from the Sense HAT to the Grafana front-end dashboard.
All images used courtesy of the author.