Facebook
 Google
 GitHub
 Linkedin
Create Your Own IIoT Tech Stack Project | Part 5: Database Setup
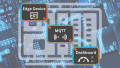
Now that our IIoT project has verified the transmission of an MQTT data payload packet, this next article will explore the setup of an InfluxDB database to store the incoming sensor data.
Explore the previous articles in the series of designing your own IIoT project, from initial sensor data collection on a Linux platform through the current discussion of database directory information.
Part 2: Testing The Data Payload
Part 3: Commissioning MQTT Broker
Part 4: Connecting MQTT Client to Broker
Databases are a critical part of many applications and systems we use in the world. They serve as a technology backbone, having specialized IT professionals who have become domain experts due to the complexity and breadth of concepts. While a dive deep into concepts is far beyond the scope of any project article, I can provide an overview for the sake of this context in this IIoT project series.
Relational vs Non-Relational Databases
At a high level, there are two main database types: relational and non-relational databases. Relational databases enforce primary and foreign keys on data records that are inserted into tables. These tables have rows and columns, and can be related to each other based on primary and foreign keys. Relational databases are great for structured data and maintaining data integrity.
Non-relational databases, also referred to as NoSQL databases, offer a more flexible but not as organized approach. Data can be unstructured and records are treated as document objects that can contain attributes that do not need primary or foreign keys. These objects are given some form of an identifier that can be used to reference them in an object store of sorts. The concept is somewhat similar to AWS S3 buckets or Azure blob storage.

Figure 1. A visual of relational vs. non-relational databases. Image used courtesy of mparticle
InfluxDB Non-Relational Database
InfluxDB is a type of non-relational database that is a popular choice for IoT sensor data applications. Instead of using document IDs to store JSON payloads, Influx leverages timestamps as the object store identifier. It also supports a high throughput of data being written to the server, perfect if the use case has multiple IoT devices firing payloads of sensor data to the server.
Within Influx, queries are supported through a SQL-esque language called InfluxQL. Data points can also be organized and filtered based on measurement, tags, and fields.
Figure 2. Influxdb logo. Image used courtesy of opsview
InfluxDB Service in Docker Compose
Going back to our handy docker-compose.yaml file, we will add a service or container for InfluxDB. Using Docker Compose allows the provisioning of multiple services or containers within the same yaml file; this is a great advantage that Compose offers over the Docker CLI. We’ll add the following service as a block below into the mosquitto service.
 influxdb:
    image: influxdb:latest
    container_name: influxdb
    ports:
      - ${DOCKER_INFLUXDB_INIT_PORT}:${DOCKER_INFLUXDB_INIT_PORT}
    volumes:
      - ./influxdb_data:/var/lib/influxdb2:rw
    env_file:
      - .env
    entrypoint: ["./entrypoint.sh"]
    restart: on-failure:3
    networks:
      - local_iot_network
There are some items in the influxDB service that are different from the mosquitto configuration. The env_file key points to a .env file in the project directory that will house environment variables for the container. The .env file is below:
DOCKER_INFLUXDB_INIT_MODE=setup

# Authorization
DOCKER_INFLUXDB_INIT_USERNAME=admin
DOCKER_INFLUXDB_INIT_PASSWORD=adminpassword
DOCKER_INFLUXDB_INIT_ADMIN_TOKEN=admintoken # API token

# Organization of data in non-relational db
DOCKER_INFLUXDB_INIT_ORG=home
DOCKER_INFLUXDB_INIT_BUCKET=sensor # where data is collected and stored

# How long to keep data for
DOCKER_INFLUXDB_INIT_RETENTION=24h

# Influxdb port and host
DOCKER_INFLUXDB_INIT_PORT=8086
DOCKER_INFLUXDB_INIT_HOST=influxdb
The entrypoint parameter uses a shell script in the same project directory to pass a command to the container upon startup. It utilizes the .env file to pass environment variables to configuration settings that would normally need to be manually entered into the user interface. It also bootstraps an administrative user into the container so that we are able to log in to the influxDB container.
#!/bin/bash

# Error Handling "Catch"
set -eu -o pipefail

# Sets environment variables
export DOCKER_INFLUXDB_INIT_MODE=$DOCKER_INFLUXDB_INIT_MODE
export DOCKER_INFLUXDB_INIT_USERNAME=$DOCKER_INFLUXDB_INIT_USERNAME
export DOCKER_INFLUXDB_INIT_PASSWORD=$DOCKER_INFLUXDB_INIT_PASSWORD
export DOCKER_INFLUXDB_INIT_ADMIN_TOKEN=$DOCKER_INFLUXDB_INIT_ADMIN_TOKEN
export DOCKER_INFLUXDB_INIT_ORG=$DOCKER_INFLUXDB_INIT_ORG
export DOCKER_INFLUXDB_INIT_BUCKET=$DOCKER_INFLUXDB_INIT_BUCKET
export DOCKER_INFLUXDB_INIT_RETENTION=$DOCKER_INFLUXDB_INIT_RETENTION
export DOCKER_INFLUXDB_INIT_PORT=$DOCKER_INFLUXDB_INIT_PORT
export DOCKER_INFLUXDB_INIT_HOST=$DOCKER_INFLUXDB_INIT_HOST

# Command passed to container upon startup
influx setup --skip-verify \
--bucket ${DOCKER_INFLUXDB_INIT_BUCKET} \
--retention ${DOCKER_INFLUXDB_INIT_RETENTION} \
--token ${DOCKER_INFLUXDB_INIT_ADMIN_TOKEN} \
--org ${DOCKER_INFLUXDB_INIT_ORG} \
--username ${DOCKER_INFLUXDB_INIT_USERNAME} \
--password ${DOCKER_INFLUXDB_INIT_PASSWORD} \
--host http://${DOCKER_INFLUXDB_INIT_HOST}:${DOCKER_INFLUXDB_INIT_PORT} --force
Once these components are all assembled, the project directory will appear as below.

Figure 3. Modified project directory for influxDB. Image provided by the author
Saving the docker-compose.yaml file and running the docker compose up -d command will yield the following in the terminal.
mlevanduski@Michaels-MacBook-Pro IoTProject % docker compose up -d
[+] Running 3/3
 ✔ Network iotproject_local_iot_network  Created                                   0.0s
 ✔ Container influxdb                    Started                                   0.1s
 ✔ Container mosquitto                   Started
Navigate to localhost:8086, which is the local machine's port bound to the influxDB container. Using this loopback address, we can access the influxDB front end user interface. Enter the username and password set in the .env file and navigate around the UI to explore the influxDB options.

Figure 4. Login page for the influxDB container. Image provided by the author
Upon entering the credentials, the landing page will appear below.

Figure 5. Home page of the InfluxDB User Interface. Image provided by the author
Pressing the up-arrow icon on the left will yield the sensor bucket into which we will be adding data.

Figure 6. Sensor bucket displayed within the InfluxDB UI. Image provided by the author
Next Steps: Managing Data With Node-RED
The solution complexity has increased since we initially started. In order to orchestrate and manage the flow of data to the InfluxDB, we need a new tool to provide the ‘glue’ to hold everything together. This tool is Node-RED which we will be exploring in the next article in the series, Part 6.
Related Content