 Facebook
 Google
 GitHub
 Linkedin
Create Your Own IIoT Tech Stack Project | Part 6: Node-RED Development
This article will explore the setup of Node-RED, the glue that will serve to connect all of the individual components of the solution that we have created up to this point.
Explore the previous articles in the series of designing your own IIoT project, from initial sensor data collection on a Linux platform through the current discussion of setting up the Node-RED software.
Part 2: Testing The Data Payload
Part 3: Commissioning MQTT Broker
Part 4: Connecting MQTT Client to Broker
What is Node-RED?
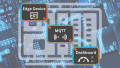
Node-RED is a flow-based programming software designed in node.js. It is a browser-based tool that can be used to integrate devices, APIs, and other technologies. It has built-in JavaScript libraries, which allow for custom functions to be created in user-defined flows. The software is inherently non-blocking and is perfect for event-driven programming, as is common in the world of IIoT devices. The graphical, browser-based programming paradigm offers a low barrier to entry and faster integrations of hardware.

Figure 1. A wireframe Node-RED browser-based flow. Image used courtesy of Node-RED
Provisioning a Node-RED Container
Similar to other preceding tools, an update to the docker-compose.yaml file is required. We’ll pull the latest image from Docker Hub, create a volume mount, and attach the container to our private bridge network. The service will be added inline below the influxDB service.
 nodered:
    image: nodered/node-red:latest
    container_name: nodered
    ports:
      - "1880:1880"
    volumes:
      - ./nodered_data/flows:/data
    networks:
      - local_iot_network
Saving the docker-compose.yaml file, and entering the docker compose up -d command should yield a similar output to what is shown below.
mlevanduski@Michaels-MBP IoTProject % docker compose up -d
[+] Running 18/18
 ✔ nodered 17 layers [⣿⣿⣿⣿⣿⣿⣿⣿⣿⣿⣿⣿⣿⣿⣿⣿⣿]      0B/0B      Pulled                   46.1s
   ✔ 9fda8d8052c6 Already exists                                                   0.0s
   ✔ ec2c8699950e Pull complete                                                    8.4s
   ✔ 9d78f986cf6a Pull complete                                                    1.6s
   ✔ 6574fa545208 Pull complete                                                    0.6s
   ✔ cdd1a35ee541 Pull complete                                                    1.6s
   ✔ abc1e563ddf0 Pull complete                                                    2.3s
   ✔ 5a5da239c876 Pull complete                                                    5.2s
   ✔ 4f4fb700ef54 Pull complete                                                    3.5s
   ✔ 4d5b464c234d Pull complete                                                    5.1s
   ✔ 36098b4f0820 Pull complete                                                    6.2s
   ✔ 93132d0d44cf Pull complete                                                    6.1s
   ✔ 9cae4697feeb Pull complete                                                    6.9s
   ✔ 30c5fe7078cd Pull complete                                                    7.8s
   ✔ bf22fd31a9cf Pull complete                                                    7.7s
   ✔ 9971afd01f41 Pull complete                                                   17.3s
   ✔ e39723d35396 Pull complete                                                   36.8s
   ✔ 05fdb984bcef Pull complete                                                   10.7s
[+] Running 4/4
 ✔ Network iotproject_local_iot_network  Created                                   0.0s
 ✔ Container nodered                     Started                                   0.2s
 ✔ Container mosquitto                   Started                                   0.2s
 ✔ Container influxdb                    Started                                   0.2s
Navigating to localhost:1880 in a browser will yield the Node-RED programming environment.

Figure 2. Intro screen to the Node-RED browser-based UI running in a Docker Container. Image used courtesy of the author
Subscribing to the Mosquitto Broker
The point of using Node-RED is to integrate the various services in our tech stack together and supervise the flow of data. The tool is based on nodes that flow from left to right, very similar to a process flow diagram (PFD) used in an industrial plant or material handling design.
To begin the flow, an 'mqtt in' node will be added to represent the Raspberry Pi and Sense HAT payload.

Figure 3. Adding a new mqtt input channel node. Image used courtesy of the author
Double-clicking on the highlighted mqtt box will yield a user interface with configuration options.
In this first dialog, (1) we will add the Mosquitto broker to the Server property by clicking on the pencil next to the 'Add new mqtt-broker…'
(2) Within this new interface, add the relevant connection information and select 'Add' in red upon completion.
(3) Back in the original editing dialog of ‘Edit mqtt in node,’ enter the Topic and Name for our Mosquitto broker to which the Raspberry Pi is publishing.

Figure 4. Adding the Mosquitto MQTT broker. Image used courtesy of the author
Select ‘Done’ in red to complete the node, and a blue circle indicates a completed setup.

Figure 5. New mqtt input properly labeled with ‘Name’ field: ‘Pi Payload’. Image used courtesy of the author
For some quick feedback on whether this was successful, we can add a debug node. Clicking the red deploy in the top right of the black bar should yield a ‘connecting’ message below the Pi Payload node. It should also display the JSON payload in the debug tab in the right pane:

Figure 6. Attempting (unsuccessfully) to connect to the Pi Payload. Image used courtesy of the author
That’s strange; why does the device seem to be frozen on connecting?
As it turns out, even though Node-RED had suggested using 'localhost' as a server name for the broker running locally, we must use our machine’s local network IP address on the network. This is different from the loopback localhost IP address. Double-clicking on the Pi Payload node and editing the Mosquitto server will re-populate the configuration window. Enter your machine's local IP address and select 'Update' in red.

Figure 7. Instead of using ‘localhost’, use the broker machine’s IP address instead. Image used courtesy of the author
Upon re-deploying, the flow should now function as we hoped, and the payload data is now displayed on the right side pane.
This is exciting that we have our first successful integration to the Mosquitto broker via subscription to the Pi Payload!

Figure 8. Successful connection to the Pi Payload. Image used courtesy of the author
Next Steps: Migrating the Data to a Database
We will need to build out the downstream flow to integrate into influxDB. Integration may seem simple on the surface, but as we’ll see, integrations and the moving of data can be somewhat complex. Hopefully, this article showed the basic functionality of Node-RED which we will now build upon in the next article, Part 7.
Related Content


You have put together a very nice series here. I hope you are going to finish this out. The database is pretty important for me, we are doing a Smart Town with manufacturing and a hybrid power source Hydrogen/Solar so I have to be able to mine the data, to track inefficiencies, usage stats as well as automated manufacturing systems for the project. It’s really friggen cool actually.