Facebook
 Google
 GitHub
 Linkedin
PLC Program Commands: Arrays Part 4, Statistics and Sizing
Learn how to make complex calculations for validating data easily with the STD instruction, and learn how to display array sizes programmatically with the SIZE instruction.
See our previous articles on Array Functions:
Using the Standard Deviation (STD) Instruction
If you ask me about PLCs, I can go on for days talking about their uses and how to program them. Now try asking me how to calculate the standard deviation of that array of data inside my PLC.
…
That’s about as far as I got.
I’m a programmer, not a math expert! If any of our readers are math experts, we applaud you, but the reality is that many of us understand the tangible elements, and some of the more theoretical computational concepts become vague, no matter how hard we try to understand them.
But here’s the problem: there are times we need to know the standard deviation of an array. We are going to look at a practical example of this instruction as it is used in logic. Before we do that though, we need to know what standard deviation is. Why in the world do we need this complicated mathematical operation?
First, let’s add some clarity with a picture I drew up.
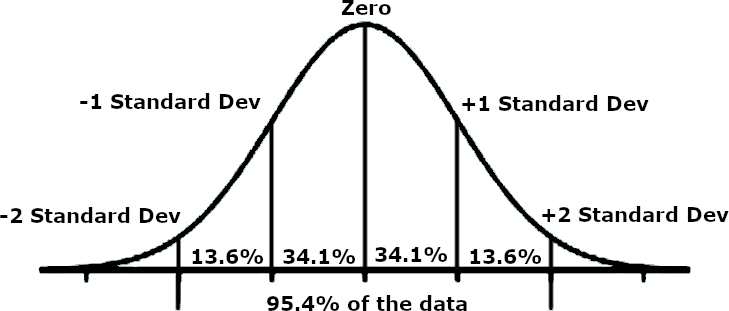
Figure 1. Example of a standard deviation bell curve in mathematical statistics.
Your zero point is the middle, or mean, of the data in your array. If you go 1 ‘standard deviation’ up and 1 ‘standard deviation’ down, you will have 68.2% of your data. If you go 2 ‘standard deviations’ up and 2 ‘standard deviations’ down, you will encompass 95.4% of your data in this region.
The reason this is valuable is that it allows you to reject data points that are outliers and may be bad data. Let’s make an example. You are collecting data from an area that has terrible interference from another critical system. This interference causes the sensor to give faulty data every once in a while. For every 200 data points you collect during the day, 2 or 3 are way off. If you tried to make decisions with this garbage data, you’d end up having problems with your calibrations.
This mathematical operation is quite familiar to those working with data analysis in the areas of quality control (QC) and statistical process control (SPC).
How Does the STD Instruction Work?
Now let’s apply the standard deviation principle! You plug all the values into an array and use the STD instruction to find out what one ‘standard deviation’ is, with respect to your data. You then set limits on the calibration data, ruling that it can only use numbers that are within two ‘standard deviations’ of the mean. You’ve now filtered out any potential outliers in your data and allowed the calibrations to continue in an automated fashion.
Without being able to filter out the garbage data, you’d be stuck going through hundreds of data points trying to tell the good from the bad. Standard deviations solve this problem. Not only do they solve the problem, but Studio 5000 places that solution right at your fingertips! Let’s take a look at how it’s done.

Figure 2. Implementation of a Standard Deviation (STD) instruction in logic.
Let’s give a rundown of the tags used by this instruction. First, we’ve got the Array field. The Array is the data set that you are going to be using. It can be an array of any standard numeric tag and have up to 3 dimensions. The next field is the Dimension to Vary, which will be dictated by your array. If you are using a standard array, then you will use the 0 dimension. For a 2D or 3D array, or more, the dimension may be 0, 1, 2, etc… The next tag is the destination. This will be the REAL that the standard deviation is stored to once it is calculated. The next field is a normal Control tag, and after it is created, you can set the Length below it.
In the example I set up above, I calculate the standard deviation of STDArray starting at position 0 and continuing for a length of 20 elements. One standard deviation of this data set is 738.197, as is seen in the Dest position.
I can now use this standard deviation to create boundaries for my data.
Using the Size in Elements (SIZE) Instruction
The size in elements (SIZE) instruction looks at an array and tells you how large a particular dimension is in that array. You might think this sounds foolish at first. Why wouldn’t I just look at the tag database and read the array size? It’s right there! If you are the only one working with the system and the arrays are always static, this is perfectly reasonable. Now let’s consider what role this instruction can play.
In a complex system, there may be a need to transfer data into a variety of arrays. Perhaps you need to send a specific amount of data to an optimization PC and there is a specific array size, but then you have to send the exact same amount over to another PC that has a different array size. Being able to know the exact number of elements in the array could be crucial in these applications.
SIZE Instruction Example
As another example, maybe you are communicating packets of data and need a checksum. Array number 1 transmits and the SIZE says it is 10 elements. The PC on the other side sees that it needs 10 elements for a complete message and can send a warning if it only receives 9. These are most likely functions that would only exist in complex systems, but we might work on those systems someday. Having the knowledge of these instructions could be very helpful. Let’s take a look at a rung of logic with a SIZE instruction.

Figure 3. Implementation of a Size (SIZE) instruction in logic.
You can see, as usual, we have our source array. After that, we tell it what dimension to use. Finally, we have the Size data field where we put our resulting data. You can check all sorts of arrays, including string arrays. If you have a user-defined datatype, this instruction may become even more valuable, as hunting down individual arrays within data types can be tedious.
With this resulting size number, you can make actionable decisions to change how a PLC functions based on the size of the data it needs to use.
While we may use these functions rarely out in the world, it is always important to know what these special tools are so that we can use them properly when the time comes. Never stop learning about them, and keep building your toolbox of skills and knowledge.
Want to test your knowledge of PLCs? You think you N.O. a lot about ladder logic? Are you a normally-open or normally-closed minded engineer?
Check out our PLC Programming worksheet!