Facebook
 Google
 GitHub
 Linkedin
Understanding PLC Program Commands: Math Instructions
We will show you how to use common math functions from two popular PLC programs—Rockwell Automation's Studio 5000 and Automation Direct Productivity Suite.
See the previous articles covering PLC programming commands:
Where would be without math in our PLCs? Every program I have written has used a math formula. Some use basic math instructions in series, while others use the long, complex COMPUTE instruction to reach their goal. However your system works, you’ll likely need some of the following math instructions for your formulas.
Math instructions come in various shapes and sizes based on the platform of PLC you choose to use. In this article, I will use Rockwell Automation’s Studio 5000 for Allen Bradley PLCs and Automation Direct’s Productivity Suite to demonstrate different math functions you will run into out in the world.
We will cover these fundamental math instructions:
-
add
-
subtract
-
negate
-
multiply
-
divide
-
square root
-
absolute value
-
modulo
This article also introduces the COMPUTE instruction which allows you to create your own mathematical functions.
Data Types
First, let’s discuss the types of data we can work with when doing math functions. All math instructions require data types that can be categorized as numbers: integers, double integers, real numbers, etc. Data types that do not equate to decimal numbers cannot be used. In my experience, the exception is that a long integer (LINT) cannot be used in math functions. This appears to be due to the data type not being native to Allen Bradley’s processors, but I do not know this for sure.
Real-World Examples of Math Functions
I try to always incorporate real-world examples into my articles. Some of these examples are harder to come by than others, but not in this case. Let’s say you need to make a running tally of how many board feet of lumber are running through a machine. Every board might be different, so you have to multiply the length times the width and add it to the total. In that case, we would likely use a multiplication instruction followed by an addition.
Using the ADD (Addition) Instruction in Studio 5000
When using the basic ADD instruction, there isn’t much to really keep track of. We add two numbers together and place the sum in the destination. In the logic of Figure 1, I add Length to Width and place the sum in the Addition tag.

Figure 1. Implementing the addition (ADD) instruction in Studio 5000. All images used courtesy of the author
It is important to note that you can take one of these tags, add a number to it, and then place the original tag in the destination. This will allow you to overwrite the old value with the new value. This is especially important for keeping running tallies. For example:
Source A: Total
Source B: NewNumber
Dest: Total
Keep in mind that if your logic is not limited by a one-shot somewhere in the system, you will end up doing the same math function a couple of thousand times per second. This has a tendency to create…problems! My example logic will not have one-shots as there are many different methods people use to limit their math functions to a single scan.
Using the SUB (Subtraction) Instruction in Studio 5000
Similar to addition, subtraction isn’t too hard to figure out. One important note for subtraction is that it will always subtract Source B from Source A. With ADD instructions our order of tags doesn’t matter; in subtraction, it is critical! Also, similar to addition, you can subtract and overwrite one of your additional values.

Figure 2. Implementing the subtract (SUB) instruction in Studio 5000.
Using the NEG (Negate) Instruction in Studio 5000
Using the Negate instruction is most similar to the subtraction instruction. Negate means subtracting the number from 0. While this might sound like an odd way of saying, “Flip the sign of a number” it is actually the mathematical way the PLC accomplishes the task. By subtracting the given number from 0, you end up with the inverse of the number you started with. Once again, a fairly simple instruction. Need a number to be negative instead of positive? Negate it!

Figure 3. Implementing the negation (NEG) instruction in Studio 5000.
Using the MUL (Multiplication) Instruction in Studio 5000
Studio 5000 keeps up the simplicity and uniformity with the MUL instruction. Easy enough, throw your numbers in and the instruction takes care of the rest—dropping the result in the Destination tag.

Figure 4. Implementing the multiplication (MUL) instruction in Studio 5000.
Using the DIV (Division) Instruction in Studio 5000
Much like the subtraction instruction, you have to make sure your tags are in the right order for the DIV instruction. Source A is always divided by Source B and dropped into the result. Don’t get it backward or you’ll be in trouble.
Also, keep in mind that loss of accuracy is likely during a division operation since the answer is likely to be a decimal or fraction, even if Source A and B are whole numbers. Be sure to account for this loss of accuracy or consider using REAL data types in the Destination tag.

Figure 5. Implementing the division (DIV) instruction in Studio 5000.
The remainder of the list includes some instructions that aren’t quite as obvious, and therefore tend to be less commonly understood.
Using the SQR (Square Root) Instruction in Studio 5000
Unlike some other programming software, Rockwell Automation gives us a dedicated Square Root function for their Allen Bradley PLCs. You can throw static numbers or tags in and it’ll output the square root in the Destination. Be aware of your tag data types though! If you have a square root that ends in a decimal number, but then drop that decimal number into a DINT tag, it’ll drop all your decimal places. Decimal numbers must always be stored in a REAL (Float) data type.

Figure 6. Implementing the square root (SQR) instruction in Studio 5000.
Using the ABS (Absolute Value) Instruction in Studio 5000
The absolute value function is used to remove a negative from a number so that it can be worked with as a positive. Earlier we used the Negate function, but that will always flip the sign. If we throw a positive number, it will become negative. An absolute function is useful because a positive number stays positive and a negative number becomes positive! Absolute values always give you a positive number.

Figure 7. Implementing the absolute value (ABS) instruction in Studio 5000.
Using the MOD (Modulo) Instruction in Studio 5000
Now let’s get into something a bit rarer! I, personally, have never used this instruction in a real program. The module function returns only the remainder when given a division problem.
In the logic below, you can see I divided 10 by 3. We know that 3 times 3 is 9 and the remainder is 1 if we are not using decimal places. This means the Modulo function will give us a 1 in the Destination tag. If we plug in 25 divided by 5, our Modulo would spit out a 0. Similarly, 31 modulo 7 is 3.

Figure 8. Implementing the modulo (MOD) instruction in Studio 5000.
Control Editorial note: If you have used the modulo (MOD) command in a program, we would love to hear more about it in the comments. Since it is less frequent in appearance, we would like to learn the context in which you use it!
Using the CPT (Compute) Instruction in Studio 5000
Now let’s talk about the most versatile math instruction Studio 5000 offers. The Compute instruction allows you to take any static value, as well as variables in tags, and process them with any valid operator. A list of operators can be found in the Studio 5000 Help files. In the formula below, I take the square root of a multiplication all at once and place the result in the destination tag.

Figure 9. Implementing the compute (CPT) instruction in Studio 5000.
You might be tempted to just use this formula everywhere as it encompasses all the different functions in one place. However, there is a reason why you shouldn’t. In PLCs, certain instructions are lightweight and others are heavyweight. In saying that, I refer to how long it takes for the processor to effectively process the instruction. A lightweight instruction is likely to be scanned in a fraction of the time it takes for a heavy-weight instruction. If your program is very large, you could begin running into scan time delays from using too many large instructions when you could have used simple instructions.
As a rule of thumb for logic programming, keep it clean, keep it simple, and keep it fast. Integer calculations are also always much faster than floating point arithmetic.
Using the MATH (Math) Instruction in Productivity Suite
Now let’s move on to the Productivity Suite Math instruction! Note that I say that in the singular. While Studio 5000 has 9 different basic math instructions (there are still more math instructions than that, but those will come later!), Productivity Suite has only one. Their math instruction functions very similarly to Studio 5000’s CPT instruction. In the logic view of Figure 10, you will see that the formula you enter is displayed. In this case, simple addition of TAG1 plus TAG2.

Figure 10. Implementing the math (MATH) instruction in Productivity Suite.
To write a formula, double-click the instruction and it will bring up the Math Editor Window shown in Figure 11.
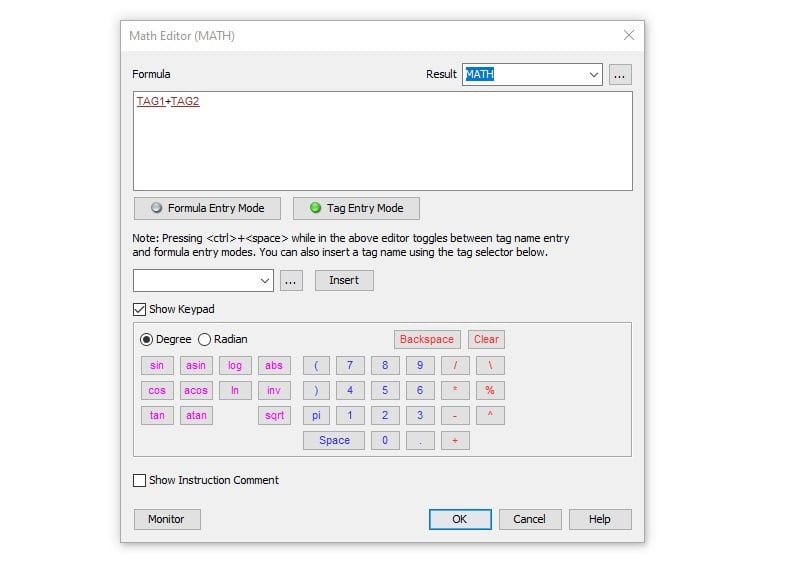
Figure 11. Math editor window in Productivity Suite.
As you can see, this acts more like a fully functioning calculator than a logic instruction. Everything is right at your fingertips. This math system includes logarithmic functions along with basics like addition and subtraction.
As with other things I have seen in the Productivity Suite, they do a good job of putting everything right up front for you. While this may be overwhelming for some people, it does a good job of making it available.
One thing to keep in mind is using the Tag Entry and Formula Entry. To enter your formula, you have to be in formula mode, then switch to tag mode to enter a tag name, then back to formula mode to finish the formula.
Math Function Programming for PLCs
When it comes to math functions in PLCs, different platforms will give you VERY different experiences. Use the Help files to your advantage and always be ready to learn new things about how your particular system works. Never be afraid to ask questions and test things out!
If you enjoyed this article, we again encourage you to check out the other PLC programming command articles:
Want to test your knowledge of PLCs? You think you N.O. a lot about ladder logic? Are you a normally-open or normally-closed minded engineer?
Check out our PLC Programming worksheet!