Facebook
 Google
 GitHub
 Linkedin
Understanding PLC Program Commands: Trigonometry Instructions
We will show you how to use the basic trigonometry functions to build ladder logic in a PLC, allowing for a clean, well-organized, and easy-to-use code that allows you and other users to troubleshoot your programs.
See the previous articles covering PLC programming commands:
How Do We Use Trigonometry?
Trigonometry (trig) is the mathematics of angles. There are many times in industry that we need to calculate how far to move something, how long a diagonal cut needs to be, or what angle we need to move in order to reach a destination. Sometimes you need to have separately stated X and Y motions, other times you have a diagonal line that you need to figure out what the opposite and adjacent lines are on it.
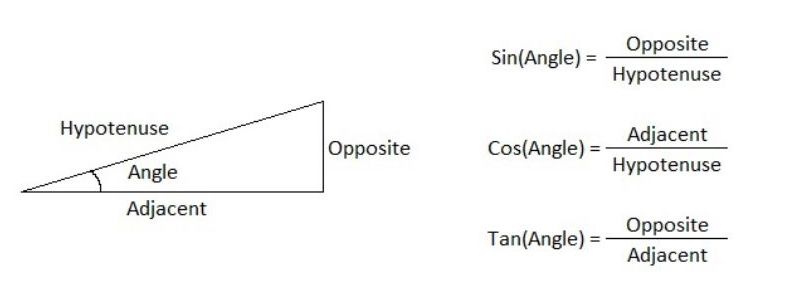
Figure 1. The four primary pieces of trig: theta, sin, cos, and tangent—and their equations used to calculate the different parts of a triangle. Author’s image
All trig equations are built on four primary elements, called the angle (theta), sine (sin), cosine (cos), and tangent (tan). These are all defined by the three sides of the right triangle geometry. I’ll be writing my tags based on these terms; you will also see them reflected in the instructions themselves. To visualize how these numbers are used, refer to Figure 1.
The angle is the gap between the adjacent and hypotenuse. It is measured in degrees and will help us calculate the other parts of the triangle. The adjacent is the horizontal or vertical line that touches the angle. The opposite is the only side of the triangle that does not touch the angle at all. The hypotenuse is the diagonal line connecting the endpoints of the opposite and adjacent sides. The equations needed to calculate everything are found on the right side in Figure 1.
For an in-depth study of trig and how to use all these different formulas, I would recommend courses in both trig and algebra, as these two fields of math go hand-in-hand. For now, let’s proceed with the ladder logic that allows us to do trig quickly in a PLC.
Real-World Examples of Trig in Programs
Using trig in programming is something that can help out in real-world situations. One time, I needed to take a log that was not positioned on the centerline of the machine and move it so that it was perfectly centered. I knew the distance of the adjacent line and opposite line, but needed to find the angle. To do this, I needed to use a variation of the tangent formula above called inverse tangent.
How do You Program Trig Commands in PLCs?
Different PLC platforms offer different methods of completing trig functions. In Automation Direct’s Productivity Suite you would input a math instruction and set it up to calculate the needed function. This method puts everything right in front of the user and offers its own advantages.
Rockwell Automation’s Studio 5000 for Allen Bradley PLCs offers a very different perspective. In addition to giving its users a compute function where they can type their own formulas, they offer individual instructions for performing the sin, cos, and tan functions. They also provide the inverse for each of these functions.
Using DEG and RAD (Conversion) Instruction in Studio 5000
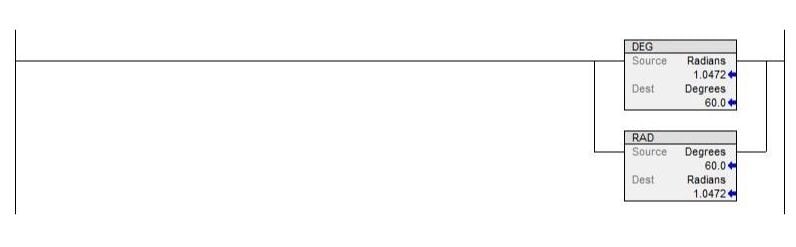
Figure 2. DEG and RAD Instructions in Studio 5000 allow you to convert between degree and radian units of measurements.
Before we use the instructions to begin calculations, there’s an important thing to note. Rockwell Automation does all their calculations in radians. If you use degrees, as I do, you will need to convert your degrees to radians. This can be done with the RAD instruction as seen in Figure 2. To convert back, use the DEG instruction.
Using the SIN (Sin) Instruction in Studio 5000
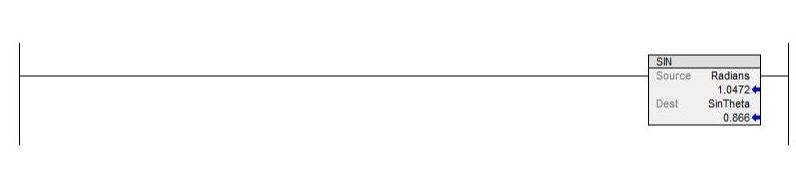
Figure 3. SIN instruction in Studio 5000 can be used to find the hypotenuse or the opposite by inputting a value and a static number or variable tag in the source and a REAL tag in the destination.
The SIN instruction, as seen in Figure 3, will allow you to find the hypotenuse or the opposite if you know the angle and one or the other of those two sides. The instructions require a value, either static number or variable tag, in the source, and a REAL tag in the destination. Remember to do your radian conversion first or you’ll have some weird numbers flying around!
For your source number, plug in your Angle.
Using the COS (Cosine) Instruction in Studio 5000
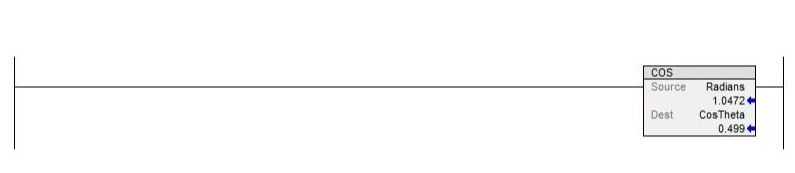
Figure 4. COS instruction in Studio 5000 can be used to find the hypotenuse or the adjacent by inputting a value and a static number or variable tag in the source and a REAL tag in the destination.
The COS instruction, as seen in Figure 4, will allow you to find the hypotenuse or the adjacent if you know the angle and one or the other of those two sides. The tag types are the same as the SIN instruction above.
For your source number, plug in your angle.
Using the TAN (Tangent) Instruction in Studio 5000
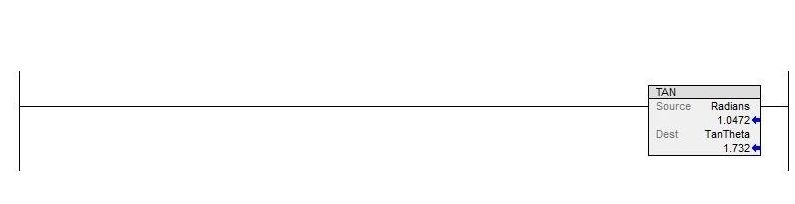
Figure 5. TAN instruction in Studio 5000 can be used to find the opposite or the adjacent by inputting a value and a static number or variable tag in the source and a REAL tag in the destination.
The TAN instruction, as seen in Figure 5, allows you to find the opposite or the adjacent if you know the angle and one or the other of those two sides. The tag types are the same as the other two instructions above.
For your source number, plug in your angle.
Using the ASN (Inverse Sine) Instruction in Studio 5000
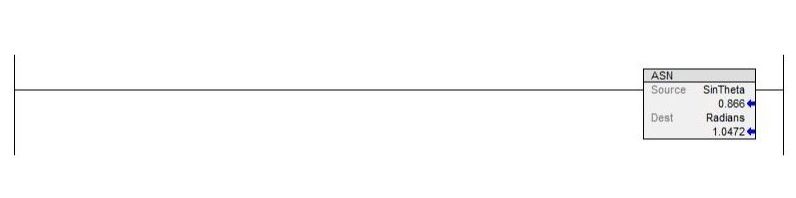
Figure 6. ASN Instruction in Studio 5000 can be used to find the angle—you’ll need to divide your opposite sides by your hypotenuse for your source number.
The inverse sine, or arcsine as it is sometimes called, allows you to find the angle if you have both the hypotenuse and the opposite sides. This inverse function allows you to take sine and work backward to find the angle. The setup is the same as the instructions before: drop your number in and get the angle out the other side. Remember that all these instructions are in radians—do your conversions appropriately.
For your source number, divide your opposite by your hypotenuse and plug in the result.
Using the ACS (Inverse Cosine) Instruction in Studio 5000
.jpg)
Figure 7. ACS Instruction in Studio 5000 can be used to find the angle—you’ll need to divide your adjacent by your hypotenuse for your source number.
The ACS, or inverse cosine, as seen in Figure 7, allows you to find the angle if you have both the hypotenuse and the adjacent sides.
For your source number, divide your adjacent by your hypotenuse and plug in the result.
Using the ATN (Inverse Tangent) Instruction in Studio 5000
.jpg)
Figure 8. ATN Instruction in Studio 5000 can be used to find the angle—you’ll need to divide your opposite sides by your adjacent for your source number.
In a similar method to the previous commands, the inverse tangent allows you to find the angle if you have both the opposite and adjacent sides. This is perhaps the most common of the three inverse functions to use, since many linear axes can easily track the motion in the X and Y direction, but must use these two values to calculate the angle of diagonal travel.
For your source number, divide your opposite by your adjacent and plug in the result.
Review
PLCs allow us to do all kinds of complex operations with all sorts of math formulas. Using step-by-step operations with dedicated trig instructions can allow your code to be very clear and easy to follow for other users that need to troubleshoot your programs. Use them to make your code clean and well organized. Happy programming!
Featured image provided by Canva
If you enjoyed this article, we again encourage you to check out the other PLC programming command articles:
Want to test your knowledge of PLCs? You think you N.O. a lot about ladder logic? Are you a normally-open or normally-closed minded engineer?
Check out our PLC Programming worksheet!