Understanding PLC Program Commands: Up and Down Counters
Counting up and down are commonly required functions in PLC lagger logic programs for tracking inventories, placement patterns, and gaining informational insights about machine performance statistics.
Every ladder logic programming system has a method of counting, a very basic function of any industrial computer system from large programs like Rockwell Automation’s Studio 5000 as well as smaller, modular platforms such as Productivity Suite from Automation Direct.
A counter appears to be very simple, but it may be more complex than some people realize. If I wrote a piece of logic that simply added 1 to a sum whenever the rung became true, it might quickly turn into a disaster. The reason we can’t simply use math instructions to count easily is because of how fast processors scan.
PLC Counter Logic
In a previous article, we discussed the function and design of One-Shots. Understanding One-Shots is critical, so go read that article if you aren’t familiar with them. We will use a One-Shot that causes our program to only scan a rung once when it is activated.
Let’s examine how the logic for a counter might look in Studio 5000 if such a pre-defined function wasn’t available (Figure 1).

Figure 1. An implementation of simple counter logic in Studio 5000. All images used courtesy of the author
The input triggers the One-Shot, and that adds 1 to the Accumulated Value (ACC). When the accumulated value matches the Preset Value (PRE), the Done bit (DN) is triggered. In order to reset the counter, we must trigger a Reset button that places a 0 in the accumulated value.
The operation is fairly simple overall; but what if you had 10 counters? You’re now dealing with 30 or more rungs and branches of logic, each requiring the individual, manual creation of named integers and booleans for each One-Shot, reset, count value, and status. To clean everything up, we could always turn to the counter instructions integrated into every ladder logic software IDE.
Using the CTU (Count Up) Instruction in Studio 5000
The CTU instruction is an integral part of the Studio 5000 programming software. This instruction provides an incredibly clean way of counting. Everything is integrated into the one instruction with the exception of the reset. Rockwell Automation has an independent reset instruction (RES) that it uses for a variety of instructions including timers and counters. When we compare this instruction as shown in Figure 2 to the logic we had to write to make the counter of Figure 1, the advantage is plain.
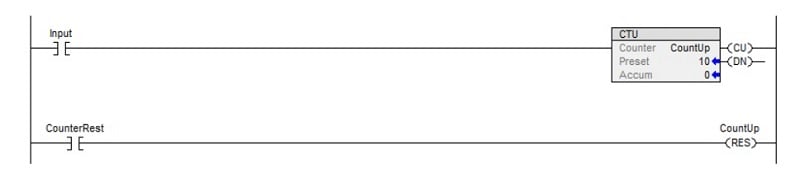
Figure 2. Count Up (CTU) instruction in Studio 5000.
Super clean! Everything is right there for you. If the input is triggered, the counter adds 1 and waits for the next signal. If there is a need for a reset, you trip the RES instruction below the input, and it sets the counter back to 0.
Bonus Tip: Because the ACC and PRE are simply double integers (DINTS), you can use a MOV instruction to place any number you want in the ACC value or PRE value on the fly.
There are some other interesting features that come with the CTU instruction. The first feature is the CU bit which can be seen on the right side of the instruction. That CU is an output parameter that turns on when the instruction is currently active. If the counter activates and the logic is true for five seconds, the counter will still only increment by 1, but the CU bit will stay on for the full five seconds.
There are two more features that are even more rarely used. These are the OV and UN bits. They are alarms that happen when the counter counts over the upper limit in a CTU or under the lower limit in a CTD. This will only happen if your counter goes over 2.15 billion or below -2.15 billion respectively, a very rare occurrence indeed!
Using the CTD (Count Down) Instruction in Studio 5000
Rockwell Automation also has a dedicated Count Down instruction in Studio 5000. The CTD instruction works in a very similar way to the CTU as you would expect. As before, it’s a single-line instruction with a built-in One-Shot and external reset.
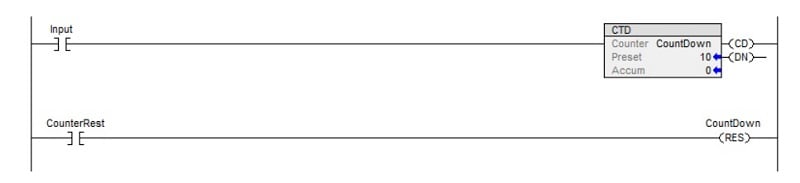
Figure 3. Count Down (CTD) instruction in Studio 5000.
Using this counter requires a little more forethought because, just like the CTU, the DN bit still goes true when the ACC is greater than the Preset Value (PRE). However, reset will still return the ACC value to 0, as it did with the CTU, so it may be necessary to use an MOV command to set the ACC value higher than the PRE, as explained in greater detail below.
There are a variety of ways you can use this instruction. The primary way that comes to my mind is to use it in conjunction with a CTU instruction. Let’s build this and see what it might look like (Figure 4).

Figure 4. Count Up (CTU) and Count Down (CTD) instructions in Studio 5000.
When we trip Input, the CTU adds 1. When we trip Input2, the CTD subtracts 1. Because it is the same set of Counter tags (as indicated by the identical tag name ‘Count’ in both counters), the preset is the same on both. If you change one, it will change the other to match.
Another way you might use the CTD is to use a MOV instruction to place a larger number into the ACC which will cause the DN bit to become active, then count down to your PRE number and watch for the DN bit to turn off. It’s a little backward, but that’s ok. If you can generate clean and effective code, it’s ok that you think outside the box a bit, but be sure to document any unique methods out of respect for any engineers following you.
Using the Counter Instruction (CNT) in Productivity Suite
As is normal with Automation Direct’s Productivity Suite, it operates differently than Rockwell Automation’s Studio 5000. Productivity gives you open access to all the different parts of the counter in their standard Counter instruction as shown in Figure 5.
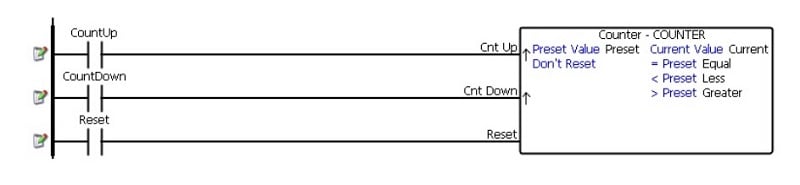
Figure 5. Counter instruction in Productivity Suite.
That is a little more complex, right? There count up, count down, and reset functions are all built-in. In addition to these 3 input functions, the instruction itself displays some additional settings found inside. Figure 6 shows the settings available when we open up the Counter instruction.
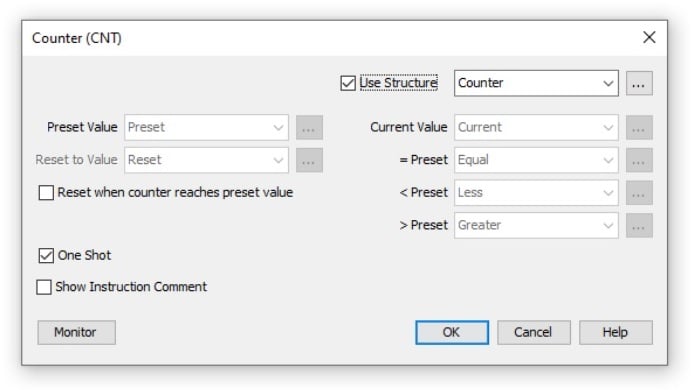
Figure 6. Counter instruction settings popup window in Productivity Suite.
We have a lot of bits we can use and a couple of settings to check. When we create our counter (I have appropriately named it “Counter”) using the ‘Structure’, we are given a variety of tags to use. We can tell the counter what its preset is, see its current value, and find out if it is equal to, less than, or greater than, the preset.
We can also tell it to reset when the counter reaches the Preset. This would be done in addition to the Reset input we have above in the logic.
Down in the bottom left, you’ll also see this counter can actually turn off its One-Shot functionality. I have never used this function, but you might!
Using the Simple Counter (SCNT) in Productivity Suite
Are you looking at that counter and thinking, “I don’t need all that. I just want to count!” That’s okay. Productivity has another instruction that is more simple. Can you guess the name? You guessed it - Simple Counter.

Figure 7. Simple Counter instruction in Productivity Suite.
This is probably what you were envisioning when you thought about counters. A count-up input and a reset input. There are some additional parameters inside as shown in Figure 8.
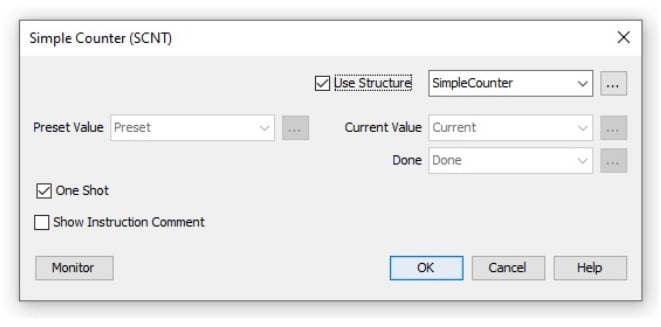
Figure 8. Simple Counter instruction settings popup window in Productivity Suite.
The only manipulation that can be done to this instruction is whether or not you want it to have a One-Shot. Mine always do, but, as I mentioned before, your system may not need the One-Shot.
Counting Up and Counting Down with PLCs
As we have learned, counters can be employed to count up or count down. Depending on your platform, you will have different options. Some are simple; others are complex. Some have easily viewed data, while others have hidden features you might not know you needed!
Finally, always be ready to look through the Help files in your programming software and don’t be afraid to learn new things about instructions you may have been using the same way for ages.
Want to test your knowledge of PLCs? You think you N.O. a lot about ladder logic? Are you a normally-open or normally-closed minded engineer?
Check out our PLC Programming worksheet!