Facebook
 Google
 GitHub
 Linkedin
Electrical Drawings, Schematics, and Wiring Diagrams: How to Read Them
In order to trace control system problems to the core, the ability to read and interpret various resources, from facility-level diagrams to machine-level wiring layouts, is critical.
The engineering world is crammed full of drawings and diagrams of every possible kind. System level function blocks, physical 3D models and prints, piping and instrument diagrams (p&ids), wiring diagrams, ladder diagrams, electrical power flow diagrams, PCB schematics… You get the idea.
The problem is that, for most failures and maintenance operations, you must consult and compare several of these at a time, so we must understand at least a few of them. For automated equipment, these resources will almost certainly include functional diagrams, electrical prints, circuit-level schematics, and even mechanical drawings, all at the same time.
For engineers involved in control system settings, we need to define a few of these resources.
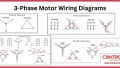
Function Block Diagrams
These diagrams are most commonly heard in control circles when referring to one of the PLC IEC 61131 languages, FBD. However, they are also used to define a conceptual process of information flow from inputs to final output.
Function blocks are often seen with feedback devices, PID loops, and SCADA system diagrams where it is beside the point to show each device and connection. The purpose is in the name: they are designed to show the function of each signal, not the connection of the wires. In a sense, function blocks explain ‘why,’ while the electrical diagrams illustrate ‘how.’

Figure 1. A function block diagram, although it can represent the connection of physical devices, is meant to show a logical connection. One line may even represent multiple conductors with other devices between them. Image used courtesy of Schneider Electric
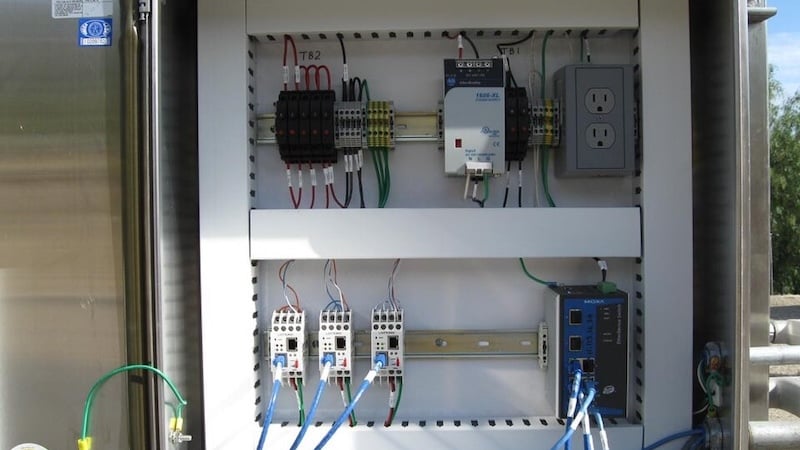
Electrical Diagrams and Prints
These drawings are the most common go-to resources you encounter when troubleshooting a machine. They might actually go by many other names, and here are a few I have run across, but likely there are many more:
-
Wiring Diagrams
-
Electrical Prints
-
Line Diagrams
-
Electrical Drawings
-
Circuit Diagram
The main thing here is that they rarely (never in my own experience) include the term ‘schematic’. That word is reserved for a component-level layout of the circuits inside the individual devices contained within the larger system.
The idea of the electrical or wiring diagram is to trace the flow of power and signals between the sources, control devices, and final loads. These will usually be drawn in a line format from left to right, but are not analogous to ladder diagrams.
Reading electrical diagrams is one of the most important skills for anyone in a troubleshooting role, and it’s not easy. Each wire, represented by a line, will have a number indicating its relative position on the page, and if it spans between pages, it will also include numeric designators for the page and the line number on that page where you can find the other end of the wire.

Figure 2. One page of a schematic with many contactors (including reversing contactors) and motors, with power entering from the top. Image used courtesy of the author
For example, imagine a machine with a 3-phase input supply, distributed to several drives, a few DC power supplies, and a 1-phase connection for cabinet lighting. The diagram will show the initial infeed and breaker, then distribute to many pages, each with categories of functions.
Depending on the size and complexity of the machine, we might expect to find a number of contiguous pages that show motor controls, each with a network or digital I/O wires. Another section of the print may include all of the PLC modules. These wires will go off to another section showing the sensor and output devices; relay, solenoid, light, etc. This page may even loop back to the digital I/O terminals in previous sections.
Anyone reading these prints (even the digital PDF versions, where ctrl-f to search is absolutely amazing) should get used to flipping back and forth quickly and easily. The ability to translate wire numbers in a print to any corresponding linked pages, and then locate that same wire in the real world… That person has an extremely valuable skill set.
Within the scope of these drawings, the symbols that indicate each device are a mix of function blocks and schematics. While we certainly care about each terminal of the PLC module, we do not care about the transistors and optocouplers inside the PLC. A sensor will not show the internal presence of an NPN or PNP transistor, it will instead be shown as a small rectangle. Load devices are usually a circle with a letter or symbol inside to show function.
Sometimes, graphical images are used in these diagrams, but this is often avoided because a lack of standardization can be more confusing.
Electrical Schematics
Ambitious troubleshooters often take the final step into asking ‘why’ - why did the part fail? Why does the voltage fluctuate? Why did the cable come loose from the housing? If we are satisfied with replacing a device and throwing the old one away, we may never need to look into the component-level construction.
To be fair, in a production setting, it often costs FAR more in downtime to fix a part than to simply grab a new one off the shelf.
But, every once in a while, we do need to examine which capacitor inside a module is to blame for a failure, or why a certain signal is not received by one module yet is perfectly valid in another.
For these situations, the circuit schematic can be useful. Usually, we find only the most relevant sections of a circuit highlighted for our benefit in a user manual. Such is the case in a PLC I/O module, where only enough information is provided to see the interaction from the optocoupler to the crowbar circuit, and finally to the output MOSFET. (If any of these terms are confusing, you may need to study up a little more on circuit schematics).

Figure 3. Side-by-side comparison of the wiring diagram (drawing), the actual device, and the circuit schematic of the output circuits (MOSFET and Zener diode visible). Image used courtesy of the author
Many devices exist in both diagrams and schematics. Both will contain indicators, relays, power supply connections, transformers, fuses, and others. However, the symbols will usually be different. As an example, a relay schematic symbol is a coiled line like an inductor right beside the COM, NO, and NC wires entering and exiting as needed. But in an electrical diagram, the coil is a circle denoted with R or CR and a number. The vertical line contact symbols may be on an entirely separate page.
Mechanical Drawings
Finally, in a separate category are the prints that will represent the machine true to scale. This helps with assembly and locating the individual parts. You’ve seen this before; a car engine will have an exploded view that shows every cylinder, sensor, and screw. However, it will also have wiring diagrams that are in a completely different part of the manual. Different documents for different purposes.
There are also piping and instrument diagrams (p&id) for HVAC and process control designs, and CAD models to supplement welding cut sheets. These all are very common, but a bit outside the realm of electrical controls.
Are These Names Always Accurate?
I wish I could say that these document names are always used in exactly this manner, but that is not true. In this sense, I can only speak from my own experience, which covers only the tiniest fraction of engineering around the world.
Many names are indeed used interchangeably, but the main point here is not to memorize the names of the drawings.
I do not in any way want to insinuate that if you use a different term, then you are wrong and should be corrected. The purpose is to understand the different electrical resources at your disposal, and know how to read them to locate the failures and repair them as quickly as possible!
At the end of the day, who cares what you call the drawing? If you understand enough to locate and fix the problem quickly, you did the right thing.
Featured image used courtesy of Adobe Stock