Facebook
 Google
 GitHub
 Linkedin
Managing Program Versions: Use Git to Commit and Track Files
If you’re working collaboratively with teams in a corporate industrial setting and require a version control system for critical software or documents, Git is a must-have in your skillset.
Managing different versions of files across multiple computers and users can be a nightmare for developers. In much the same way that cloud collaborative tools have aided word processor and spreadsheet users, these version management tools, like Git, have helped to track changes across files for developers and programmers.
What is This Strange-Named Tool?
According to the source code for Git, the acronym can be interpreted in various ways. There are some humorous and colorful definitions. However, the most official interpretation is “global information tracker”. Git is the world's most widely used distributed version control system (VCS).
A version control system allows users to track or restore changes to a file or a group of files across different versions. It is used by programmers, writers, scientists, and even governments for a plethora of use cases. One common industrial control application of Git is the tracking of program changes inside a PLC or IPC system to ensure the latest copy of the code is on hand.

Figure 1. Git logo. Image used courtesy of git-scm
What is a Distributed VCS?
To better understand the advantages of Git, a high-level understanding of the iterative flavors of VCS is required. Even in today’s mature technology world, the average person, myself included, tends to adopt a renaming strategy of a single file in a local directory. For example, this could resemble various versions of a high school or college essay:
- Essay_v1.docx
- Essay_v2.docx
Or it could resemble different iterations or approaches of the original content:
- Essay_newIntroduction.docx
- Essay_mainArgument2.docx
While this can serve the purpose of version control, it only exists locally and is highly prone to human error, as the author is likely to be the only person familiar with the naming convention.
The centralized VCS model was developed to address this problem. This model allows teams to collaboratively work by means of checking files out and into a centralized remote server. The main disadvantages include a single failure point of the centralized server and the inability of multiple users to check out and work on a file at the same time. Furthermore, the one-thousand-foot view or snapshot of the version database could not be accessed locally.

Figure 2. A centralized version control system (VCS). Image used courtesy of git-scm
Thus, the distributed version control system (DVCS) was born. Users do not check out files. They receive a copy of the current state of a repository which is a remote collection of files, tracked changes, and sub-directories. This repository is edited locally, thus eliminating the locking behavior of files in the centralized model.

Figure 3. A distributed version control system (DVCS). Image used courtesy of git-scm
Local vs. Remote Repositories
There is a distinctiveness between local and remote tools. Git is software that runs locally on Computer A and Computer B in Figure 3. Git itself does not need a network connection and does not support collaboration locally. The remote Server Computer in Figure 3 is delivered through cloud services that host collaborative repositories. A popular cloud service is GitHub. Git and GitHub are used synergistically to deliver the DVCS illustrated in Figure 3.
To summarize, Git is the local repository, and GitHub is the remote repository.
Basic Local Workflow
We’ll focus on the basics of a local workflow in Git for the remainder of this introductory tutorial. The workflow can be divided into three sections.
- Workspace (working directory)
- Staging area
- Committing staged changes to capture the most recent snapshot (.git directory repository)

Figure 4. Basic Git workflow. Image used courtesy of git-scm
This might not make immediate sense, but that’s okay because we can illustrate with an example.
Define the Project Folder and Git Repository
Git can be installed given the git-scm instructions here: installation. We’ll start in the workspace level. When working locally, a Git repository is instantiated inside of a root project folder using:
git init
This action creates a repository out of the root project folder and adds a strange .git directory to the root project folder. For example, a Git repository was created in the molding directory below:

All following images courtesy of the author
Let’s check the status of the Git repository:

Branches are something we will cover in a separate article. For now, understand that the main or master branch is the default branch created and active when a repository is created. The .git directory is monitoring for any changes to the molding folder like a vigilant watchdog. Since the folder is empty, it’s letting us know it has nothing to report and is even suggesting that a good first step would be to create files.
Staging and Committing
Let’s create an empty XML file that represents an instance of an injection molding machine within the molding repository:

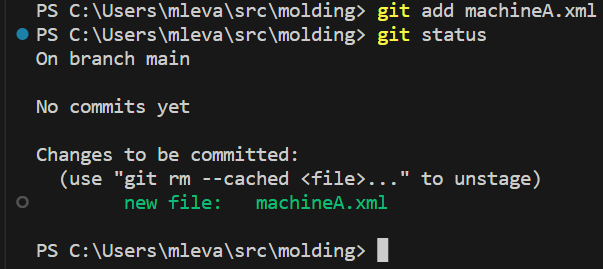
Notice how the text is red and there is a capital U, indicating the file is untracked by Git. But we do want to track this file. Running a Git status command should help us know what to do next:

In order to track the file, we need to enter the staging area. To move untracked files or changes to files into staging, the following command can be used:
git add machineA.xml
Adding machineA.xml to staging looks like such:
Now the machineA.xml file is in the staging area. In order to make this file part of the official record, we need to commit our new file. This can be done with the following command:
git commit -m "Created empty machineA.xml file"
Committing the machineA.xml file looks like such:

In this example, we utilized a terminal to operate Git. This is the most widely used tool in practice. However, there are capable GUI options that exist. One such tool is gitkraken. These options are very helpful for visualizing the Git process. In our case, the Git tree looks as follows after the initial machineA.xml file creation:

Conclusion
Congratulations! You’ve mastered the essentials of initializing, staging, and committing changes to your repository using Git. The next article will explore another critical topic of branching.