 Facebook
 Google
 GitHub
 Linkedin
A Hands-on Walkthrough of MQTT Protocol Using the paho-mqtt Open Source Library
No more IIoT buzzwords! This article aims to walk through an implementation of MQTT using the paho-mqtt library using nothing more than your local machine and some simple Python programming.
What Is MQ Telemetry Transport (MQTT)?
MQTT is a lightweight communication protocol that leverages a publish and subscribe architecture. Messages are transmitted and received as payloads via JavaScript Object Notation (JSON) over a topic channel from edge devices to a central server called a broker. It was first invented to fill the need for industrial communication to remote devices in the oil and gas industry.

Figure 1. MQTT can be found in many integrate or off-the-shelf devices. Image used courtesy of Adobe Stock
Paho MQTT Relevance
Many integrated or off-the-shelf devices come equipped with MQTT out of the box. However, if you find yourself in a situation where you need to develop a quick, low-cost proof of concept IIoT solution, this article will be helpful. Furthermore, with an economic recession likely on the horizon at the time of this article, budgets are strained, and you or your company may not have the money for a more formal PLC solution. Therefore, a more cost-effective, short-term solution could be a Raspberry Pi running the open-source paho-mqtt package from the Python package index PyPI.
Step 1: Basic Integrated Design Environment Setup
In this exercise, we will utilize our local machine as a pseudo-edge device and establish communication with a sandbox MQTT broker. We will begin by downloading an integrated development environment, such as Visual Studio Code (VS Code), for either a Mac, Linux, or Windows operating system.
Once the download is complete, we will open the VS Code application. Upon startup, we will need to download Python for VS Code. Official documentation on this process can be found here. However, it can simply be installed by selecting the extensions button below and downloading “Python” published by Microsoft below:
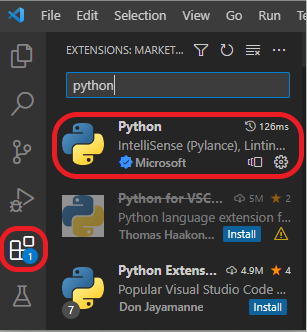
Figure 2. Python extension in VS Code. Image supplied by author
To create a new file, we will select “File > New File…” very similar to a Microsoft word document. Another method to create a new file is selecting the new file button in the central window:

Figure 3. Two methods of new file navigation in VS Code. Image supplied by the author
Upon being prompted which file type to create, type in “python” and select the built-in file format:

Figure 4. File type selection. Image supplied by author
We will now have a blank canvas and a tab named “Untitled-1” with a blue Python logo similar to the one below:


Figure 5. The VS Code environment with a new “Untitled-1” Python file. Image supplied by the author
Save and name the file to a directory (file path) of your choosing.
The last step will be to install the paho-mqtt package from PyPI. Documentation on how to install it can be found here. The simplest method of installation is opening a new terminal under “Terminal > New Terminal” and by typing in the command below:
pip install paho-mqtt
Now we can begin programming our pseudo-edge device!
Step 2: Python Script
First, we must import packages that will provide additional pre-defined tools to make script development more efficient. These tools, called modules or libraries, have built-in functions that can make either redundant or complex tasks much simpler.
import paho.mqtt.client as mqtt
import json
import random
import datetime
import time
The second block of code will define callback functions that are triggered when a specific event occurs. The on_connect function returns an integer of 0 if the MQTT client successfully connects to the MQTT broker. The latter two functions are triggered when a new message is published to a topic to which the client is subscribed.
# The callback for when the client receives a CONNACK response from the server.
def on_connect(client, userdata, flags, rc):
    print("Connected with result code "+str(rc))

    # Subscribing in on_connect() means that if we lose the connection and
    # reconnect then subscriptions will be renewed.
    client.subscribe("$SYS/#")

# The callback for when a PUBLISH message is received from the server.
def on_message_from_pressure(client, userdata, message):
    print("Received message '" + str(message.payload) + "' on topic '"
        + message.topic + "' with QoS " + str(message.qos))

def on_message_from_temperature(client, userdata, message):
    print("Received message '" + str(message.payload) + "' on topic '"
        + message.topic + "' with QoS " + str(message.qos))
Next, we will sequentially create an MQTT client, connect to a broker, establish a network loop, create a client id, and define two topic channels. Please note that topics generally follow a hierarchical structure that provides intuitive information on what physical value is being reported:
# Create MQTT client
client = mqtt.Client()

# Call on_connect function to ensure broker accepted client connection
client.on_connect = on_connect

# Connect to sandbox MQTT Broker
client.connect("mqtt.eclipseprojects.io", 1883, 60)

# Establish network connection loop using loop_start() method
client.loop_start()

# Establish a client_id for the edge device (usually a hostname)
client_id = 'test_device'

# Establish a topic for pressure specific tags
topic_pressure = 'Plant1/Building1/Shop1/CompressedAirLine1/Pressure'

# Establish a topic for temperature specific tags
topic_temp = 'Plant1/Building1/Shop1/CompressedAirLine1/Temperature'
The last piece of our code is perhaps the most complex. Please do not be intimidated—a visual diagram is provided thereafter to explain a bigger-picture overview better. We are creating a while loop that will scan our dummy sensor values indefinitely on a set interval, very much like a PLC scan. The MQTT client, our computer running the script, will publish these dummy values to a broker and will also subscribe to the pressure topic to show proof of transmission for demonstration purposes. The distinction in subscribing to the pressure topic demonstrates that MQTT clients can selectively choose which messages to receive and are not required to receive all topic traffic from the broker in subscribing.
# Continuously scan input states just like a PLC
scanning = True
scan = 1
while scanning:

    # Create dummy tags
    process_pressure = random.uniform(2.3, 50.5) #psi
    process_temp = random.uniform(120.4, 240.6) #fahrenheit

    # Create payload for pressure tags
    pressure_payload = {
        "Timestamp": datetime.datetime.now().timestamp(),
        "client_id": client_id,
        "pressure": process_pressure,
            }
    # Serialize paylaod to JSON
    payload_pressure = json.dumps(pressure_payload)

    # Create payload for temperature tags
    temp_payload = {
        "Timestamp": datetime.datetime.now().timestamp(),
        "client_id": client_id,
        "temp": process_temp
            }
    # Serialize paylaod to JSON
    payload_temp = json.dumps(temp_payload)

    # Same client will subscribe to broker, but will only subscribe to pressure topic
    client.subscribe(topic_pressure, qos=1)
    client.message_callback_add(topic_pressure, on_message_from_pressure)

    # Publish payload to Broker on defined topic
    client.publish(topic = topic_pressure, payload = payload_pressure, qos=0)
    client.publish(topic = topic_temp, payload = payload_temp, qos=0)

    # Create counter and add a delay to establish scan rate
    print(f'Device Scan Number: {scan}')
    scan += 1
    time.sleep(5) # seconds
Put all together the code should resemble below:
import paho.mqtt.client as mqtt
import json
import random
import datetime
import time

# The callback for when the client receives a CONNACK response from the server.
def on_connect(client, userdata, flags, rc):
    print("Connected with result code "+str(rc))

    # Subscribing in on_connect() means that if we lose the connection and
    # reconnect then subscriptions will be renewed.
    client.subscribe("$SYS/#")

# The callback for when a PUBLISH message is received from the server.
# Called when a message has been received on a topic that the client subscribes to
def on_message_from_pressure(client, userdata, message):
    print("Received message '" + str(message.payload) + "' on topic '"
        + message.topic + "' with QoS " + str(message.qos))

def on_message_from_temperature(client, userdata, message):
    print("Received message '" + str(message.payload) + "' on topic '"
        + message.topic + "' with QoS " + str(message.qos))

def main():
    # Create MQTT client
    client = mqtt.Client()

    # Call on_connect function to ensure broker accepted client connection
    client.on_connect = on_connect

    # Connect to sandbox MQTT Broker
    client.connect("mqtt.eclipseprojects.io", 1883, 60)

    # Establish network connection loop using loop_start() method
    client.loop_start()

    # Establish a client_id for the edge device (usually a hostname)
    client_id = 'test_device'

    # Establish a topic for pressure specific tags
    topic_pressure = 'Plant1/Building1/Shop1/CompressedAirLine1/Pressure'

    # Establish a topic for temperature specific tags
    topic_temp = 'Plant1/Building1/Shop1/CompressedAirLine1/Temperature'

    # Continuously scan input states just like a PLC
    scanning = True
    scan = 1
    while scanning:

        # Create dummy tags
        process_pressure = random.uniform(2.3, 50.5) #psi
        process_temp = random.uniform(120.4, 240.6) #fahrenheit

        # Create payload for pressure tags
        pressure_payload = {
            "Timestamp": datetime.datetime.now().timestamp(),
            "client_id": client_id,
            "pressure": process_pressure,
                }
        # Serialize paylaod to JSON
        payload_pressure = json.dumps(pressure_payload)

            # Create payload for temperature tags
        temp_payload = {
            "Timestamp": datetime.datetime.now().timestamp(),
            "client_id": client_id,
            "temp": process_temp
                }
        # Serialize paylaod to JSON
        payload_temp = json.dumps(temp_payload)

        # Same client will subscribe to broker, but will only subscribe to pressure topic
        client.subscribe(topic_pressure, qos=1)
        client.message_callback_add(topic_pressure, on_message_from_pressure)

        # Publish payload to Broker on defined topic
        client.publish(topic = topic_pressure, payload = payload_pressure, qos=0)
        client.publish(topic = topic_temp, payload = payload_temp, qos=0)

        # Create a delay to establish scan rate and display scan iteration
        print(f'Device Scan Number: {scan}')
        scan += 1
        time.sleep(5)

if __name__ == "__main__":
    main()
The desired output in the terminal window generated from the execution of the script should resemble a similar output to below:
Device Scan Number: 1
Connected with result code 0
Received message 'b'{"Timestamp": 1679465273.772731, "client_id": "test_device", "pressure": 2.457299506060717}'' on topic 'Plant1/Building1/Shop1/CompressedAirLine1/Pressure' with QoS 0
Device Scan Number: 2
Received message 'b'{"Timestamp": 1679465278.786786, "client_id": "test_device", "pressure": 45.41734027028782}'' on topic 'Plant1/Building1/Shop1/CompressedAirLine1/Pressure' with QoS 0
Device Scan Number: 3
Received message 'b'{"Timestamp": 1679465283.797761, "client_id": "test_device", "pressure": 28.083898548496123}'' on topic 'Plant1/Building1/Shop1/CompressedAirLine1/Pressure' with QoS 0
From a big-picture overview, our client is shown both publishing and subscribing to the broker below:

Figure 6. The architecture of the solution developed in this exercise. Image supplied by author
IT/OT Convergence
This tutorial highlights the importance of bridging the gap between the operations and information technology realms. As Industry 4.0 continues to garner interest, professionals with skills intersecting both realms will be valuable to companies seeking to unlock the full potential of digital transformation.


pip install paho-mqtt gives an error:
At line:1 char:1
+ pip install paho-mqtt
+ ~~~
+ CategoryInfo : ObjectNotFound: (pip:String) [], CommandNotFoundException
+ FullyQualifiedErrorId : CommandNotFoundException
How do I fix this please? .(JavaScript must be enabled to view this email address)