Facebook
 Google
 GitHub
 Linkedin
How-To: Implementing a Data Highway Plus (DH+) System
Allen Bradley’s Data Highway Plus (DH+) networking ability is still found commonly in interfaces with legacy equipment. Understanding this network structure can bridge the gap between old and new systems.
For many years, Allen Bradley has had the Data Highway Plus platform. In this preceding article, we provided an overview of the different types of Data Highways that Allen Bradley uses, of which, DH+ is the most prevalent in existing networks. It is still very much alive, widely used, and able to serve with a couple of unique advantages over Ethernet in some situations.
This article will expand into the area of how to go about deploying a Data Highway Plus System.
Why use a DH+ Network?
The first question to be answered is this: why would we use Data Highway Plus (DH+) when we have access to the more advanced modern system of Ethernet? There are a few reasons that should be explored.
Ease of Wiring
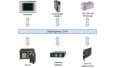
The first is the wiring simplicity. The DH+ system has only three wires - Blue, Clear, and Drain - making it very easy to work with, able to be serviced with basic tools, and with keyed removable connectors, has some natural immunity to getting wires crossed up or reversed.

Figure 1. DHRIO module wiring information. Image used courtesy of Rockwell
Simple Device Setup
The second advantage is that no specialized technical knowledge is needed to set up a new device. Usually, the settings are defined as hardware configurations. Simple DIP-switch settings can match up an address if a technician needs to swap a module. Being able to replace broken equipment quickly is advantageous in almost any situation and industry!
Legacy Compatibility
The third reason (and my personal favorite) is the ability of DH+ to network both old equipment and new equipment! To think that old control systems like SLC500 and PLC5 are gone and will never be seen again is simply not realistic. A majority of manufacturing facilities can be found running a multitude of these old controllers that existed long before standardized network protocols were established. DH+ allows networks to pull data out of old PLC5 systems and drop this data into a modern ControlLogix processor. From there, that data can be passed back and forth between machines or stored for measuring production values locally or in the cloud.
With these advantages, it is plain to see that DH+ still has a place in the world of industry.
DH+ Network Hardware Setup
The next issue we must address is how to set up the network. We will start with hardware requirements relating to the setup. Most devices are going to be the processors and remote I/O devices. PLC5 processors, remote rack units, and PC connection cards will be some of your primary components along with some of the SLC500 processors and Flex IO units. One important module relating to the bridging between the old and new systems is the 1756-DHRIO card. This card plugs into the ControlLogix chassis and allows the communication from an ENBT Ethernet card, through the backplane, into the DHRIO Card, and out to the DH+ or RIO network.
The next important issue that must be addressed is the terminating resistor. If you get this wrong, the system will not function properly so do not forget it! The terminating resistors will go between the blue and clear terminals on BOTH ENDS of the network. There are two different resistors and the choice depends on the three different baud rates (communication speeds). There are also max distances for each speed.
| Baud Rate (in kbps) | Resistor Value | Max Distance |
| 57.6 | 150 Ohms | 10,000 Feet |
| 115.2 | 150 Ohms | 5,000 Feet |
| 230 | 82 Ohms | 2,500 Feet |
Figure 2. DH+ network limitations
The last consideration for hardware is setting the node numbers. This subject crosses us over to the programming side as well. On some devices, you will find the software determines the baud rate and node number. On other devices, you will find dip switch settings. Despite sometimes having software configuration on some devices, these settings are usually very easy to set and do not deal with octet addresses, netmasks, and gateways like the more complex Ethernet systems.
DH+ Network Configuration
With these hardware topics covered, it is time to cover some network design principles. One of the chief things to remember is that each DH+ network (or Link) is limited to 32 devices. If you go larger, you will need multiple networks with devices that can jump between these networks. Touching back on the speed issue, it is also important to make sure all your devices are capable of communicating at the same speed. Some old controllers may only be capable of transmitting at 57.6 kbps while others can jump up to the 230 kbps speeds. You have to drop to the lowest common speed.
Another important thing to remember is that these devices are usually daisy-chained together. That means the wires go into a terminal and come out of that same terminal to go to the next device. Once again, remember your terminating resistor at each end when you have no devices left in the daisy chain.

Figure 3. Adding a DHRIO module into a Studio 5000 project tree. Author’s image
There are two additional best practices that stem from personal experience, which may seem obvious enough, but are often overlooked. The first is to always run your data cables in a conduit that runs a safe distance away from high current conductors. One small accident can destroy any wire that is exposed to the elements. The second best practice is to always label your conductors. In a small network, you might be tempted to run wires and leave them. Always mark your multi-conductors with their appropriate machine name as well as the node number; you can also add a device part number to help others working on the system in years to come.
Software Setup for DH+
One of the benefits mentioned throughout is the simplicity of DH+. This simplicity is also noted in how DH+ networks are set up on the software side. Most people have painstakingly added device after device into RSLinx. When working with the 1756-DHRIO module, there’s no need for this! Wire up your DH+ network, set the node number and baud rate with the DIP switches, and add the card to your rack. Then you just set the appropriate channel to DH+.

Figure 4. Message configuration defines the origin PLC type, along with the requested address (Source Element), the number of integers to be delivered, and the tag name of the destination. Author’s image
After doing this, you can go into that chassis in RSLinx. You will see the card, see the DH+ channel inside of it, and it will automatically populate all the devices in that network to go online with them!
Finally, I want to cover some considerations that must be made when deploying a system that exchanges data with a ControlLogix system. ControlLogix communicates over DH+ readily with a MSG (message) instruction within the ladder logic.
It might be tempting to simply exchange a couple of arrays of BOOLs or INTs to send data back and forth, but this can easily bog down your network. A good way to alleviate this problem is to tie a timer into your MSG instruction trigger that you can adjust at will as you add data exchanges. Another good idea is to limit your exchanges to only what is needed at the time. This may be more labor-intensive to change your tags every time you want to add data, but if you are running dangerously low on speed, it is a good tool to know about.
Summary
Data Highway Plus is a good tool to understand and utilize in the unique situations it applies to. I hope this helps everyone working in the field with these devices!